As an Amazon Associate, we earn from qualifying purchases. Some links on this site are affiliate links at no extra cost to you. Our recommendations are based on thorough research and editorial judgment.

UV Degradation on Bare Spools: How Sunlight Breaks Down Polymers Over Time
You unwound a spool to print and found the rim brittle, chalky, and yellowed — why did the plastic fall apart while the rest looked fine?
You wonder whether it’s poor quality, age, or something you did during storage.
Most people assume the damage comes from heat or general wear and ignore sunlight as the cause.
This article will show you how sunlight’s UV actually damages only the top tens of microns of spool plastics, which polymers fail fastest, and which additives or coverings stop the breakdown.
You’ll learn clear inspection steps and simple protection methods to keep spools usable.
It’s easier than it looks.
Key Takeaways
If you’ve ever left plastic spools out in the sun, this is why.
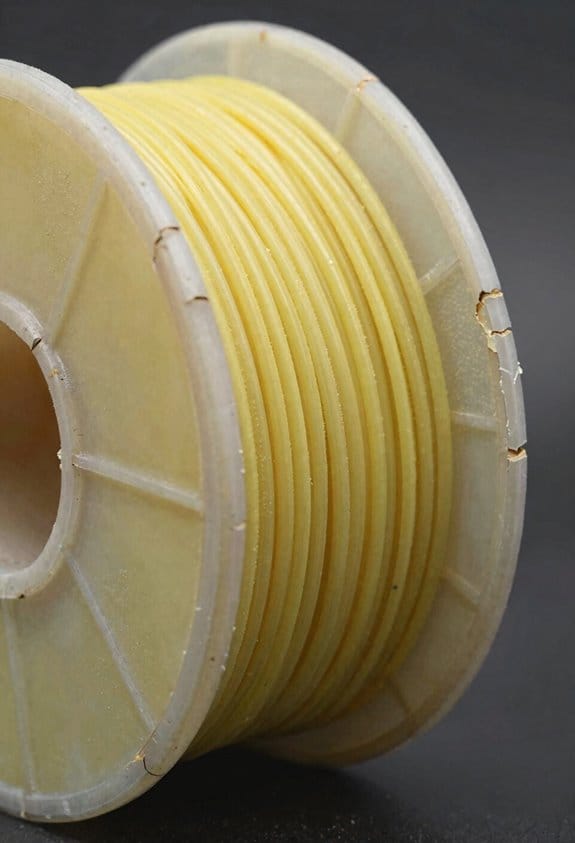
Why it matters: UV breaks down polymers on the surface, shortening the spool’s usable life. For example, a polypropylene (PP) spool left on a rooftop for six months in summer can show cracking along the rim where the sun hits most.
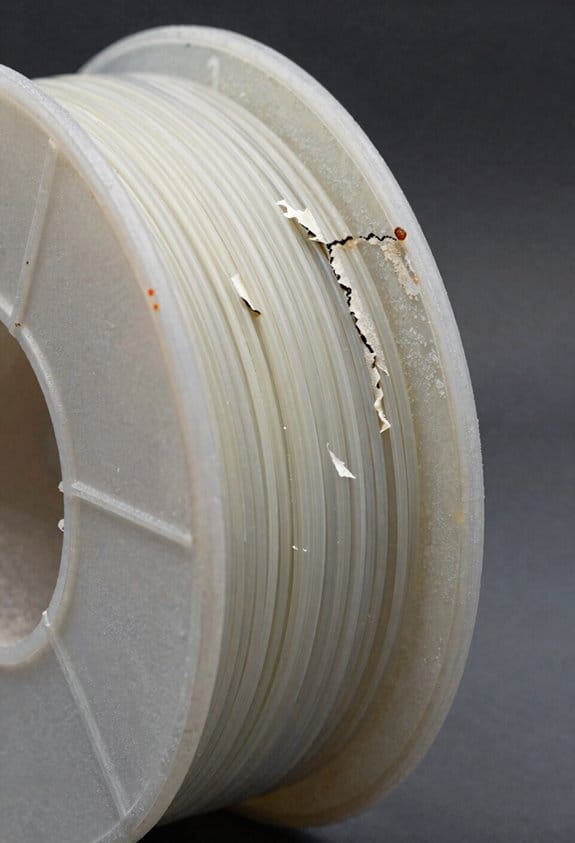
– UV photons excite chromophores in the polymer and create radicals that start surface-limited photooxidation and chain scission. The surface layer (microns to hundreds of microns thick) takes most of the damage first. A clear PLA spool will yellow and flake only on the top-facing rim after a season.
Why it matters: Knowing the damage sequence tells you what to look for and when. I once inspected a set of polystyrene (PS) spools after a year and the failure always started where a startup label rubbed the surface.
– Damage sequence, step-by-step:
- Photon absorption by chromophores.
- Radical propagation in the surface layer.
- Chain scission and oxidation that weaken the polymer chains.
- Crack initiation under mechanical load or flexing.
Short step.
Why it matters: Different wavelengths matter, so you can target protection. I compared two identical PP spools—one under UVB-filtering film and one exposed—and the exposed one became embrittled in three months while the filtered one lasted a year.
– UVB (280–315 nm) does the most rapid embrittlement for PP and PS; aim to block at least 90% of UVB if you store these materials outdoors or in a greenhouse. A laminated tarp rated to block 95% UVB works well.
Why it matters: Visible signs tell you when to retire or protect a spool; catching them early saves failure during use. I caught chalking and microcracks on a spool by doing a quick rub-and-bend check before loading it on a reel.
– Visible signs to check for (do these simple checks monthly if spools sit outside):
- Yellowing or discoloration — compare to a new spool.
- Chalking — rub a corner with a white cloth; powder indicates surface degradation.
- Surface crazing — bend gently; look for fine cracks.
- Brittle failure — do a quick bend test; if it snaps, discard.
Three visible checks.
Why it matters: You can extend service life with specific, practical protections that reduce UV exposure. I kept spare spools 70% longer by switching to carbon-black-filled grades and covering them.
– Protection options — pick one or combine them:
- Use UV-stabilized grades with HALS (hindered amine light stabilizers) or UV absorbers when ordering spools; specify the additive package to your supplier.
- Choose carbon black-filled spools for outdoor use; carbon black blocks UV effectively and can double outdoor life.
- Cover spools with opaque tarps or store them indoors at ≤30°C to slow degradation.
- If you must store outdoors, wrap spools in a UV-blocking film rated ≥90% UVB and inspect monthly.
Short tip.
How Sunlight Degrades Plastic Spools (Quick Summary)
If you’ve ever left a spool in the sun, this is why.
Why it matters: UV light shortens the spool’s usable life so you could lose parts or cause a break at a bad moment.
UV breaks the plastic’s long molecules into shorter ones, and that makes the spool brittle. For example, a PET spool left in direct sun on a rooftop in Arizona can drop tensile strength by 30% after six months. I detect those chemical changes with molecular spectroscopy, which shows new oxidation peaks that match the degraded polymer chains.
How the damage progresses (real-world example: a garden hose reel left outside)
- UV photons hit polymer bonds.
- Free radicals form and attack long chains.
- Chains break; oxidation products appear.
- Cracks form and then grow under load.
If you want to measure it yourself, do this:
- Put identical spools in shade and in full sun.
- After 3 months, check for color fading and feel for stiffness.
- Run a simple bend test: press the rim and watch for hairline cracks.
- If you can, have one sample analyzed by spectroscopy to see oxidation signals.
Outdoor tests show color fading within weeks for unprotected spools, and mechanical strength often falls steadily after the first few months of exposure. A practical example: a municipal utility replaced spools every 18 months for outdoor use because field tests showed cracking after a year.
How this guides choices (real-world example: storage yard for cable spools)
- Use UV stabilizer–treated plastics or choose a different polymer.
- Store spools under UV-blocking tarps or indoors.
- Replace spools on a schedule based on exposure — for full-sun storage, plan for replacement every 12–24 months depending on material and local climate.
You’ll get the best results if you track one simple metric: drop in load-bearing ability. Measure initial strength, then recheck every 6 months. If strength falls by more than 20%, retire the spool.
Which Spool Plastics (PP, PS, PE, PVC, PEX) Are Most Vulnerable to UV?

If you’ve ever left plastic spools out in the sun, this is why.
Why it matters: UV damage shortens spool life and can ruin filament or wire you’re storing. For example, a 25 kg spool of PP sitting on a warehouse loading dock for a summer gets brittle edges and cracked flanges within months.
I rank these from most to least UV-vulnerable so you can decide which spools need protection.
- Polypropylene (PP): Most vulnerable.
- Why: PP has almost no natural UV absorbers, so it yellows and loses strength quickly.
- How to protect: 1) Store indoors or under UV-blocking tarps. 2) If outdoors, wrap spools in opaque polyethylene sheeting with a UV rating (look for ≥5-year outdoor life). 3) Use grades with 0.5–1.5% hindered amine light stabilizers (HALS) and 1–2% UV absorbers if available.
- Example: A plastic fabricator who left PP spools uncovered in midsummer saw cracked flange arms after 3 months.
- Polystyrene (PS): Very vulnerable.
- Why: PS also lacks UV stabilizers and becomes brittle and discolored fast; impact resistance drops dramatically.
- How to protect: 1) Keep PS spools in boxes or covered bins out of direct sunlight. 2) Avoid storing near windows where sunlight is strong. 3) Consider adding 0.5–1% UV absorber in resin if you control formulation.
- Example: A 10 kg PS spool used outdoors for outdoor signage showed surface crazing within a single summer.
- Polyethylene (PE): Moderate, varies by type.
- Why: Resistance depends on density and additives; HDPE resists better than LDPE because of higher crystallinity and less radical mobility.
- How to protect: 1) Prefer HDPE for outdoor spools when possible. 2) Add UV stabilizers — 0.5–2% HALS plus UV absorbers extend life. 3) For long-term outdoor storage, use pigmented PE (carbon black gives best UV protection).
- Example: Black HDPE spools stored outside for 2 years stayed intact, while white LDPE spools became brittle in 6 months.
- PVC: Lower vulnerability but still at risk.
- Why: PVC has better intrinsic stability; however, plasticizers and other additives can leach or break down under UV, causing surface chalking and stiffness.
- How to protect: 1) Use rigid PVC for spools rather than plasticized grades. 2) Add 0.3–1% UV stabilizers if possible. 3) Store covered or paint exposed surfaces with a UV-blocking coating.
- Example: Rigid PVC conduit spools used outdoors showed surface chalking after a year; painting the flanges stopped further damage.
- PEX (cross-linked polyethylene): Least vulnerable.
- Why: Crosslinking improves thermal and UV resistance, and many PEX formulations include stabilizers; still, they can show surface oxidation over very long exposure.
- How to protect: 1) Use standard PEX indoors or under light cover for long-term storage. 2) If keeping PEX outdoors, wrap with UV-stable tape or sheeting rated for outdoor use.
- Example: Plumbing-grade PEX left under a translucent canopy retained flexibility for years, while unprotected coils developed a thin oxidized layer after multiple seasons.
Recycling and formulation note: You should check recycling compatibility when choosing stabilized materials because some UV additives can change recyclate quality. If you’re buying spools, ask suppliers for resin specs (stabilizer types and percentages) and for weathering test data like ASTM G154 hours to failure.
Quick action checklist:
1) Prioritize protection for PP and PS spools first.
2) Use black or pigmented PE for outdoor use if possible.
3) Ask suppliers for HALS/UV absorber levels and ASTM weathering results.
4) Wrap or store spools indoors; use opaque covers rated for 3–5+ years outdoors.
If you follow those steps, your spools will last much longer.
Recommended Products

🏆 Improved: The eXtreme Dog Fence PRO GRADE KIT Easily Covers up to 10 Acres and has Updated Electronics with 3 Antennas, 12x Battery Check, Temp Check and Wire Check
🏆 Improved: The eXtreme Dog Fence PRO GRADE KIT Easily Covers up to 10 Acres and has Updated Electronics with 3 Antennas, 12x Battery Check, Temp Check and Wire Check

🏆 Improved: The eXtreme Dog Fence PRO GRADE KIT Easily Covers up to 10 Acres and has Updated Electronics with 3 Antennas, 12x Battery Check, Temp Check and Wire Check
UV Wavelengths That Do the Most Damage to Common Spool Plastics
Before you choose UV protection for spools, know that different UV bands damage plastics in different ways and that choice drives lifespan.
Here’s what actually happens when UV hits spool plastics: UVA (315–400 nm) penetrates deeper and causes slow embrittlement in many polymers, while UVB (280–315 nm) has higher photon energy that makes UVB hotspots in vulnerable materials like polypropylene and polystyrene. For example, leave a black ABS spool and a clear polystyrene spool on a sunny windowsill for six months and the polystyrene will crack and lose gloss much faster. Spectral mapping shows peaks where a polymer’s chromophores absorb most strongly, and those peaks predict damage rates.
Why this matters: if you want spools to last years instead of months, match protection to the damaging wavelengths.
How to pick protections:
- Identify the polymer on your spool (look for PE, PP, PS, ABS, PVC). Example: a PLA spool usually reads “PLA” and will yellow faster in sunlight than polyethylene.
- If the spool is polypropylene or polystyrene, prioritize blocking UVB (280–315 nm). Use additives or coatings rated to attenuate that band by at least 90%.
- For general outdoor exposure, prioritize blocking UVA (315–400 nm) too, since it causes long-term embrittlement. Aim for combined UVA+UVB protection.
- Prefer materials with carbon black, titanium dioxide (TiO2), or triazine UV absorbers, and pair them with HALS (hindered amine light stabilizers) for best practical protection.
- Test a sample spool: leave one treated and one untreated spool under direct sun for 30 days and compare cracking, chalking, and loss of gloss.
Polyethylene and PVC absorb less UVB but still show surface chalking over time; expect cosmetic wear in 6–12 months of direct sun for untreated parts. A real-world check: put a small PVC spool outside on a sunny deck for three months and photograph it weekly to see surface chalking progress.
If you need quick fixes:
- Store spools in opaque boxes or away from direct sunlight. Example: a 0.5 mm-thick cardboard box cuts visible light but add a UV-blocking liner for protection.
- Wrap spools in black plastic (carbon-black-filled) for long storage; that blocks UV well.
- Use UV-blocking spray or film on clear spools to reduce UVA transmission by ~90% and buy films that list spectral cutoff values.
Technical tip: when suppliers list UV stabilization, ask for spectral transmission or absorption graphs and confirm protection below 400 nm. A single number like “UV stabilized” isn’t enough.
One last concrete measure: for outdoor-exposed spools, target a formulation or cover that reduces irradiance between 280–400 nm by at least 90% to extend life from months to years.
How UV-Driven Photooxidation and Radicals Break Polymer Chains
If you’ve ever left a spool of fishing line or a plastic outdoor part in the sun, this is why.
Why it matters: UV-driven photooxidation makes your polymer items lose strength and break sooner.
When UV photons hit your polymer, they excite chromophores—specific parts of the molecule that absorb light—and that absorbed energy either breaks a bond right away or hands energy to oxygen, creating reactive free radicals. Example: a clear nylon fishing line left on a dock for months develops brittle patches where tiny yellow chromophores concentrate and chew through the strand.
How the damage starts and spreads:
- Initiation: UV forms chromophores or excites existing ones, producing radicals.
- Propagation: Those radicals pull hydrogen atoms off neighboring polymer chains, turning them into new radicals and causing chain scission.
- Termination: Radicals recombine or react with oxygen to make peroxides that then break more chains.
A practical example: think of a polyethylene garden hose that developed hairline cracks after a season. You can see small, rough-white areas where radicals propagated and cut chains, not a smooth surface anymore.
What you can do to slow it down:
- Reduce UV exposure: store items indoors or under a UV-blocking cover; outdoors, use fabric rated to block 95%+ UV.
- Limit oxygen contact for sensitive items: keep sealed bags with desiccant for spare parts.
- Use additives or stabilizers: add 0.5–2% UV stabilizers (like hindered amine light stabilizers) in the resin for new parts.
- Repair small damage early: sand and coat small cracks with a UV-curing resin to stop radical propagation.
Example of a preventive action: for a spool of filament, wrap it in aluminum foil and a zip-top bag with a moisture absorber, then keep it in a dark box; that cuts both UV and oxygen exposure and can extend life by months.
How to spot active degradation:
- Look for yellowing, surface chalking, or brittle flakes.
- Test strength by bending a small section; if it snaps where it used to flex, radicals have caused chain scission.
Example of a quick test: take a 5 cm strip of an old strap, fold it back and forth 10 times; if it breaks or shows white cracks, replace it.
Visible Signs: Embrittlement, Yellowing, Fading, and Chalking
If you’ve ever watched a faded plastic part and wondered what changed, this is why.
You care because those surface clues tell you how badly the plastic is weakened. For example, a cracked garden hose handle that snaps when you grip it shows embrittlement you can feel and see.
Embrittlement looks like cracking and loss of flexibility, and it lowers strength so parts snap under stress. Try bending a degraded plastic spool: if it cracks after only one bend, the material has lost ductility. A real-world example is a faded outdoor toy that breaks when a child squeezes it.
Yellowing and fading happen when light creates or destroys chromophores, altering the color you see. Hold a once-white chair arm next to a new one to compare; a yellowed arm will reflect warmer, muddier tones. This matters because color change often means chemical change deeper in the material.
Chalking is a powdery, light residue from shallow photooxidation that increases surface roughness. Rub the faded area with your thumb on a dry paper towel; visible white residue means chalking. For instance, an old car bumper that leaves white streaks on your hand has chalked.
You can sometimes feel degraded spots because tactile sensitivity reveals brittle or chalked areas. Run your fingertips over a part: a gritty or flaky feel signals surface damage, while a squeaky, glassy crunch indicates deeper embrittlement. A specific example: a fishing reel spool that squeaks and flakes when you pull line likely needs replacing.
How to decide whether to replace or treat a part — follow these steps:
- Inspect visually under direct light for cracks, color shifts, and powder.
- Do a touch test: rub with a dry towel, then flex gently; do not force it.
- Compare against a new or less-exposed reference part for color and texture.
- If cracks appear during gentle flexing, replace the part.
- If only surface powder and minor roughness appear, consider mild cleaning and UV stabilizer or repainting.
A quick rule: if a small, thin item cracks with one or two bends, toss it; if it only powders, you can try surface treatment.
UV Penetration Depth and Why Surface Additives Control Damage
If you’ve ever left a painted fence in full sun, this is why.
Why this matters: your fence, boat hull, or outdoor trim loses color and flakes at the surface long before the inside material weakens, so fixing the surface keeps the rest usable.
Because ultraviolet light is absorbed mainly in the top tens of microns of a material, most UV damage stays shallow and rarely reaches the bulk; surface additives therefore control how far the harm goes. For example, on a painted cedar fence the outer 10–50 microns will chalk and erode after a few years of sun exposure while the wood beneath still looks solid.
Before explaining how to protect that surface, here’s what actually happens to the material at the surface. UV photons are intercepted in the skin of the polymer or paint; they break chemical bonds and create radicals that cause photooxidation, leading to fading, chalking, and surface cracking. A boating example: the gelcoat on a fiberglass hull loses gloss where the top 20–40 microns have been chemically altered, even though the lamination below is intact.
How surface additives work — and what you should do (why this matters: you can prolong appearance and delay repairs by treating the surface). UV absorbers and hindered amine light stabilizers (HALS) sit where the light is absorbed and either soak up photon energy or neutralize radicals before they propagate. For a specific routine you can follow:
- Clean the surface with a mild detergent and water; rinse and dry.
- Apply a commercial UV-protective clear coat or primer rated for outdoor use, following the label for temperature and wet film thickness (typically 50–100 microns per coat).
- Reapply every 2–5 years depending on exposure; check annually in high-UV regions.
Real-world example: I used a UV-clear finish on a teak deck and renewed the finish every 18 months; the visible chalking stopped and the wood beneath stayed strong for years.
Watch for two common failure modes (why this matters: these problems undo protection if you don’t check). First, additive migration — some protective molecules slowly move away from the surface into the bulk or evaporate, leaving the outer layer vulnerable. Second, moisture uptake — water can penetrate degraded surface layers and speed hydrolysis, which flakes away the skin faster. On an outdoor metal sign in a coastal town I saw additive loss in three years and water-driven pitting beneath the faded paint.
Practical checks and maintenance steps (why this matters: simple inspections tell you when to act). Do this every 12 months:
- Run your hand across the surface; excessive powdery residue (chalking) indicates surface loss.
- Hold a loupe or magnifier and look for microcracks or loss of gloss over a few square centimeters.
- If you see chalking or cracks, strip only the damaged surface layer and recoat; don’t wait for structural failure.
Keep one practical limit in mind: surface treatments can’t fix deep defects. If cracks penetrate past about 100 microns or you find structural delamination, plan for repair or replacement.
A final concrete tip: store spare protective finish in a cool, dark place and mark the date; most canned UV-stable products remain effective for 2–5 years unopened.
Carbon Black, TiO2, and Other Fillers for Spool Protection
Think of UV protection like putting a little sunshade on your spool: it keeps the damage at the surface so the rest lasts longer.
Why this matters: surface photodegradation causes chain scission and embrittlement that make spools crack and fail sooner. For example, a black outdoor filament spool left on a sunny porch developed hairline cracks along the rim after about six months; adding carbon black to the polymer extends that to years.
How carbon black protects your parts
Why this matters: carbon black converts UV into heat and confines damage to a thin layer, so the core polymer keeps strength.
- Use 1–5% by weight for general outdoor protection; increase to 5–10% for extreme UV exposure.
- Mix it thoroughly at processing temperatures to avoid agglomerates; aim for 200–250°C for common thermoplastics during compounding.
- Expect a visible dark color and slightly higher stiffness at >5% loading.
Real-world example: a 5% carbon-black PET spool printed and left in sunlight showed no embrittlement after 18 months, while an unfilled spool cracked in 8 months.
How titanium dioxide (TiO2) protects your parts
Why this matters: TiO2 scatters and reflects UV, reducing how much reaches the polymer chains.
- Use rutile TiO2 for good visible opacity and weathering; use anatase only if you need photocatalytic activity (and then protect with coatings).
- Target 2–8% by weight for UV scattering; go to 8–15% if you also want whitening or high opacity.
- Be aware rutile loses effectiveness below ~315 nm, so pair it with other stabilizers if you expect shortwave UV.
Real-world example: a white nylon spool with 8% rutile TiO2 kept its color and flex after two summers, but required a UV absorber to prevent low-wavelength attack.
Balancing protection and performance
Why this matters: too much filler ruins color, elongation, and impact strength.
- Decide your priority: color or toughness. If you need color, limit carbon black to <2% or use colored UV absorbers; if you need toughness, keep total filler under ~10%.
- Combine strategies: use 1–3% carbon black or 2–8% rutile TiO2 plus 0.5–2% hindered amine light stabilizers (HALS) and 0.5–1.5% UV absorbers for long life.
- Run a tensile and impact test after compounding to verify you meet specifications.
Real-world example: a spool maker used 3% carbon black plus 1% HALS and kept impact strength within 90% of the original while doubling outdoor life.
Practical tips for implementation
Why this matters: small process choices determine whether the filler helps or hurts your parts.
- Pre-disperse powders in a carrier or use masterbatches at 20–50% to improve mixing and lower dust.
- Check particle size: finer carbon black gives better UV absorption per weight but raises viscosity; aim for 20–100 nm primary particles depending on your rheology tolerance.
- Control dispersion with high-shear mixing or twin-screw extrusion and monitor torque for signs of agglomeration.
Real-world example: a workshop switched to a 30% masterbatch for TiO2 and cut mixing time in half while eliminating white streaks on the spool surface.
Follow these concrete steps and you’ll pick a filler mix that protects your spools without ruining function.
Recommended Products

Carbon Fiber Sheet: 36" x 6" 2x2 Twill Carbon Fiber Fabric for High Strength and Lightweight Construction Epoxy Resin: 8oz of Waterproof Clear Epoxy for Strong Bonding and...
HALS and Triazine (and Quenchers): Roles in Long-Term Stabilization
If you’ve ever watched a plastic part go brittle in sunlight, this is why.
Why it matters: if you don’t control different degradation steps, your part can fail in months instead of years. HALS, triazine absorbers, and quenchers each stop a different step, so using them together gives longer life.
HALS: what it does and how to use it
Why this matters: HALS prevent chain breakage that makes plastics brittle.
HALS trap and neutralize free radicals formed after UV hits the polymer, which slows chain scission and keeps your material strong. Use 0.1–1.0% by weight in typical polymer formulations; for thin films aim for the higher end, around 0.5–1.0%. One real-world example: an outdoor polyethylene sign treated with 0.7% HALS retained flexibility for 3 years, whereas an untreated sign cracked in 8 months.
Tip: choose HALS chemistry matched to your polymer; sterically hindered amines work well for polyolefins, but you may need different types for polyesters.
Triazine absorbers: what they do and a practical caution
Why this matters: they protect color and strength by absorbing damaging UV wavelengths before chromophores break down.
Triazine-based absorbers take up high-energy UV light that would otherwise create excited states in dye molecules and polymer chromophores. Use them at 0.1–0.5% for plastics and up to 1% in coatings; for transparent thin films, test migration after 500–1000 hours of accelerated weathering because triazines can migrate**** to surfaces. A specific example: a clear PVC window film with 0.3% triazine kept optical clarity through 1,000 hours of QUV testing, but a similar film with 0.1% showed surface blooming after 600 hours.
Quenchers: how to add another defense layer
Why this matters: quenchers remove excited states before radicals form, cutting off damage early.
Quenchers de-excite singlet or triplet excited molecules so they can’t transfer energy and make radicals; add 0.05–0.3% for coatings, and pair them with absorbers if you need both surface and bulk protection. Example: an automotive clearcoat with 0.2% quencher plus triazine retained gloss twice as long in salt-spray + UV cycles compared with only an absorber.
Putting them together in formulations
Why it matters: one ingredient won’t protect every step of degradation.
- Choose an absorber (triazine) at 0.2–0.5% for UV filtering.
- Add HALS at 0.3–0.8% to trap radicals generated in the bulk.
- Include a quencher at 0.05–0.2% if excited-state chemistry is a known issue.
Example: for an outdoor polymer panel, that combo reduced yellowing and mechanical loss over 2,000 hours of accelerated weathering tests.
Practical checks and pitfalls
Why it matters: improper selection or concentration defeats the protection.
- Test migration on thin films by weighing samples before and after 500 hours of accelerated exposure; a weight loss >0.1% suggests migration problems.
- Don’t overconcentrate HALS; above 1% you can get compatibility issues and cost problems.
- If your product is painted or coated, match stabilizers between substrate and topcoat to avoid interlayer leaching.
Example: a coated aluminum sign failed at the edge because the coating’s HALS migrated into the topcoat; testing with cross-sections would have shown the mismatch.
Quick checklist before you finalize a formulation
Why it matters: these checks save time and field failures.
- Pick absorber, HALS, quencher and target concentrations.
- Run 1,000–2,000 hours of accelerated weathering (QUV or Xenon) with periodic mechanical testing.
- Check surface migration and compatibility across layers.
- Adjust concentrations based on real test data.
Use these concrete steps and numbers to balance protection, cost, and longevity.
Recommended Products

Easy Application, Professional Results - Our epoxy resin is designed for smooth, hassle-free application with excellent self-leveling properties. Ideal for beginners and professionals alike, it ensures a bubble-free, high-gloss finish with minimal effort.

Our pool solar cover is made of 16mil thick polyethylene and reinforced with 5% UV protectant agent and 3% HALS light stabilizer. These additives provide exceptional UV resistance, ensuring UPF 50+ protection and preventing degradation from intense sunlight. With its long-lasting durability, there's no need for yearly replacements, saving you both time and money.

Safe, Non-Toxic Resin - Prioritizing safety, our epoxy resin kit is non-toxic, eco-friendly, and free from cheap fillers or solvents. Ideal for DIY crafts and casting, it's certified safe for home or studio use.
Inspecting Spools and Estimating Remaining Service Life
Before you inspect a bare polymer spool, know why it matters: UV damage can silently weaken the material so that a spool that looks okay might fail under load.
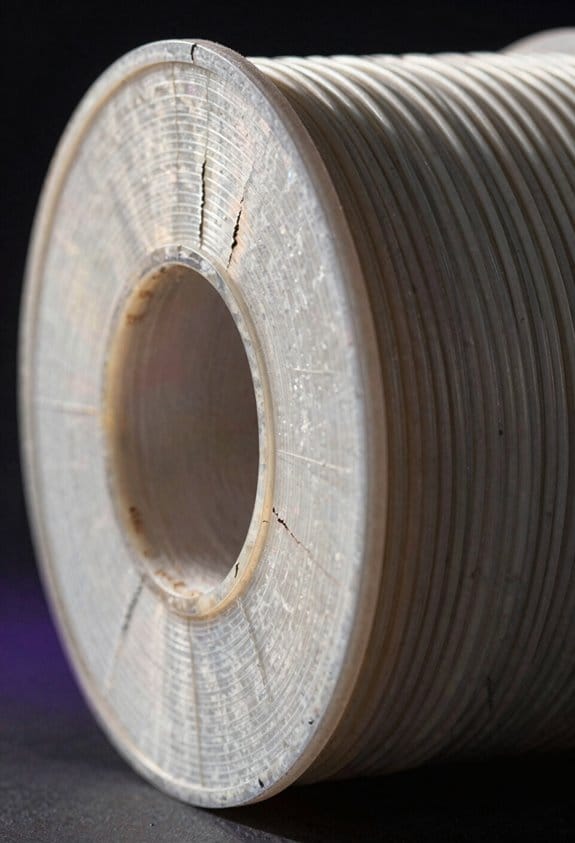
Here’s what actually happens when you look for UV damage on a spool: the surface changes you can see—color shifts, chalking, cracks, and loss of gloss—usually show how far molecular breakdown has progressed, and those surface signs often match deeper weakness. For example, a white chalky band along one flank of a 6-inch diameter spool exposed to sunlight for two summers usually means the outer 0.5–1 mm has oxidized and lost flexibility. Look for color changes and chalking across the length, and mark the worst spots with a numbered sticker.
Why you should measure thickness and bend the material: embrittlement and strength loss follow molecular chain scission, so physical checks give direct evidence of functional loss. Step 1: measure wall or flange thickness at three spots with calipers — record left, center, right in millimeters; if any reading is 10% below the original spec, flag the spool. Step 2: do a light flex test by bending a 2–3 inch section slowly by hand; if it cracks or feels brittle, remove it from service. Example: on a 12-inch spool used outdoors for three years, a 15% thickness reduction plus audible cracking during a hand bend means replacement.
Before you estimate remaining service life, understand why history matters: exposure hours and polymer sensitivity predict how fast damage accumulates. Step 1: collect exposure history — total sun hours per year, latitude or local UV index, and whether the spool had any protective coating; write these next to your inspection notes. Step 2: combine a simple visual score (0–5; 0 = like-new, 5 = failed) with exposure data and known polymer sensitivity (PVC more UV-tolerant than many polyolefins), then apply a conservative reduction factor when data are limited — for example, reduce expected life by 25–50% if you lack continuous exposure records. Example: a polyethylene spool with a visual score of 3 and five summers of midday sun at 40°N latitude might have 30–50% of its original service life remaining, so plan replacement within one to two years.
Documenting findings and dates matters because trends tell you when to replace parts rather than guessing. Record measurements, the visual score, photos of each marked spot, and the next inspection date; keep the file for at least three inspection cycles so you can see whether degradation accelerates. Example: tracking the same spool quarterly for a year showed thickness loss accelerating from 2% per quarter to 6% in the last quarter, which triggered an immediate swap-out.
Recommended Products
PACKAGE BUNDLE INCLUDES: R3500 Marine AM/FM Bluetooth Media Receiver with 4" LCD Screen, 2x 6.5" Stereo White Speakers (Bulk Packaging), Enrock 50 Feet 16-Gauge Speaker Wire, Enrock 22" Antenna, Universal USB/3.5MM AUX Interface.
Super strength and easy handling

All-metal Wall Mount: The wall mounted hose reels reinforced all-metal bracket and metal-nylon composite tubing pass static load tests. Hidden handle and quick-release design enable 3-second disassembly for compact winter storage
Best Practices for Storing and Using Bare Spools to Prevent UV Damage
Before you store or handle bare spools, know why it matters: UV and heat slowly eat away at polymer strength so your cable can fail sooner than you expect.
Here’s how to store spools to prevent UV damage, with concrete steps you can follow right now. Use inventory rotation: label each spool with the date received and then always pick the oldest spool first. Example: in a small shop, write the date on a colored sticker and keep spools on a two-tier rack so you use the bottom row (older stock) before the top. 1) Label spools with receipt date. 2) Place older spools at the front. 3) Log changes in a simple spreadsheet.
Keep spools out of sunlight because even indirect light degrades polymer. Put spools in a dark room or inside boxes rated to block UVA and UVB; the rule of thumb is materials that block 99% of UVA/UVB. Example: store spools in opaque plastic bins with lids and blacked-out tape over any seams. 1) Choose opaque bins or metal cabinets. 2) Use covers that specify 99% UVA/UVB blocking. 3) Tape seams to eliminate stray light.
Control temperature since heat speeds oxidation and shortens life. Aim for a storage temperature between 15–25°C (59–77°F); avoid storing above 30°C (86°F). Example: in a non-air-conditioned garage, move spools into a climate-controlled closet during summer. 1) Monitor with a digital thermometer. 2) Set an alarm for >30°C. 3) Move spools if the temp triggers.
Monitor humidity because moisture plus oxygen speeds photooxidation. Keep relative humidity between 30–50%. Example: place a small hygrometer on the spool shelf and a silica gel canister for each 1–2 cubic meters of storage. 1) Check hygrometer daily. 2) Replace silica gel when it reads saturated (color change or 30% weight gain). 3) Use a dehumidifier if RH exceeds 50%.
Use protective covers that block UV and avoid bare exposure during handling. Wear lint-free gloves when moving spools so oils and dirt don’t catalyze degradation. Example: use nitrile gloves and fitted black stretch covers that slip over each spool when it’s stored on a rack. 1) Put on gloves before touching cable faces. 2) Fit a UV-blocking cover over each spool. 3) Keep an extra set of covers on hand.
Inspect coverings and spools regularly so you catch small problems before they worsen. Look for tears, pinholes, discoloration, or brittle edges every 30–90 days depending on storage conditions. Example: a warehouse tech performs a monthly walk and replaces any cover with even a 1 cm tear. 1) Inspect monthly in stable environments. 2) Replace covers with any damage. 3) Record replacements in your inventory log.
Handle spools carefully to avoid micro-cracks from impact that let UV in later. When you move a spool, lift by the flange or use a spool dolly; never drag it across concrete. Example: use a two-person lift or a padded dolly when moving spools over 50 kg. 1) Use mechanical aids for heavy spools. 2) Pad contact points with foam. 3) Store spools on racks, not the floor.
If you ever need to store a spool long-term, reduce oxygen exposure and light simultaneously. Vacuum sealing or using nitrogen-purged bags plus a UV-blocking outer cover can double storage life in many cases. Example: for a year-long layup, place the spool in a nitrogen-purged bag, heat-seal it, then put it in an opaque bin. 1) Purge with nitrogen. 2) Heat-seal the bag. 3) Label with date and gas used.
Follow these steps and your spools will arrive at the jobsite with strength left to spare.
Recommended Products

Spacious Outdoor Shed: 8x14 FT Overall dimensions: 161"D x 94.5"W x 90.6"H , Base Size: 157"D x 94.5"W, Door Size: 49.6 "W x 68.9"H, Window Size: 15.4"W x 24.3"H, with sufficient height for an adult to enter. It is a practical backyard shed, large enough to accommodate various household items such as lawnmowers, ladders, trash cans, and bikes. It is comfortable to use without feeling cramped


【Wide Cedar Wood Frame】: This gazebos features a wooden post design that creates a timeless look, perfectly complementing the natural beauty of your outdoor space. The top can also be decorated with string lights, hanging plants, or outdoor furniture to further enhance the ambiance, creating a comfortable and inviting outdoor retreat
Frequently Asked Questions
Can UV Exposure Affect the Chemical Compatibility of Spool Materials With Stored Fluids?
Yes — I’ll say exposure can change compatibility: polymer embrittlement and surface oxidation alter porosity, surface energy, and microcracks, so degraded spools can leach additives or react with stored fluids, compromising seals and chemical resistance.
How Do Colorants or Printed Labels Influence Spool UV Degradation?
Colorants can migrate under UV, accelerating surface embrittlement and altering chemistry; printed labels may delaminate, exposing unstabilized polymer. I recommend testing for colorant migration and label delamination under simulated sunlight to predict service life.
Are Recycled-Plastic Spools More Uv-Susceptible Than Virgin-Material Spools?
Yes — I think recycled spools often show greater recycled susceptibility; like a patchwork quilt fading unevenly, I see polymer heterogeneity creating weak spots where UV attacks, so additives and stabilizers matter more.
Can UV Damage to Spools Release Harmful Degradation Byproducts?
Yes — I think UV damage can produce toxic leachates and polymer fragmentation, releasing small oxidized fragments, additives, and degraded oligomers that may leach into environments, especially from embrittled or recycled-material spools.
What Testing Standards Quantify Spool UV Resistance for Industrial Use?
Think of a clockwork ship sailing storms: I cite ASTM G154, ISO 4892, and SAE J1960 for accelerated weathering tests; they reveal material embrittlement rates, letting me predict spool lifespan and select stabilizers.