As an Amazon Associate, we earn from qualifying purchases. Some links on this site are affiliate links at no extra cost to you. Our recommendations are based on thorough research and editorial judgment.

The Legacy of the RepRap Movement: How Open Source Created the Desktop Printer
You’re staring at a pile of plastic parts and a confusing schematic, wondering which cheap components actually matter and whether you can build a working 3D printer yourself. You’ve tried copying random online builds or buying a kit only to stall on firmware, alignment, or sourcing parts that don’t fit together.
Most people assume the only path is expensive, closed designs or perfect expertise before attempting a build. This introduction shows how RepRap’s open designs, shared bills of materials, and community-tested fixes let hobbyists assemble reliable FFF desktop printers with common parts. You’ll learn the practical steps, which parts to prioritize, and how to use community firmware and mods to get a working printer. It’s easier than it looks.
Key Takeaways
If you’ve ever started a project with parts spread across a table, this is why.
RepRap’s open-source designs mattered because they let you build a working 3D printer for a few hundred dollars instead of tens of thousands. A real example: in 2010 a high-school club printed most of their printer’s plastic parts, bought motors and electronics for about $450, and had a classroom-ready FFF machine in two weekends. The result: you can own and repair your printer without a company service contract.
Before you try to copy a design, know how community files help you. The RepRap community shared full schematics, bills of materials (BOMs), and firmware so you can follow the same plan others used and avoid guesswork. Example: download a GitHub repo for a Mendel-style printer, print the brackets, buy the listed NEMA 17 motors and GT2 belts, and flash the provided Marlin settings to match.
The difference between buying a kit and building from scratch comes down to cost and learning. Kits ranged from $300–$700 and included printed parts plus hardware, while industrial machines cost $20,000+. A makerspace I visited stocked a $350 kit that let three beginners assemble and calibrate a working printer in one weekend. If you want low cost, pick a proven kit and follow the BOM exactly.
Hands-on assembly matters because you learn the mechanics and maintenance you’ll need later. One lab taught students with an assembled Prusa i3 clone; within weeks, students adjusted belt tension, replaced a hotend, and tuned layer height. Steps to gain practical skills:
- Assemble frame and drive train following the manual.
- Calibrate endstops and motor current.
- Level the bed and print a calibration cube.
- Adjust extrusion multiplier until prints match dimensions.
Iterative prototyping and modular parts made desktop printers reliable enough for everyday use. For example, changing from a simple rectangular frame to a triangular (stiffer) arrangement reduced wobble and gave consistent 0.2 mm layers. If you want reproduceable prints, use modular parts like printable brackets and standardized linear rails so you can swap components without reengineering the whole machine.
What RepRap Is and Why It Matters
Think of RepRap like a small, do-it-yourself factory you build and improve yourself.
Why it matters: it makes 3D printing affordable and adaptable so you can make things locally instead of waiting for suppliers.
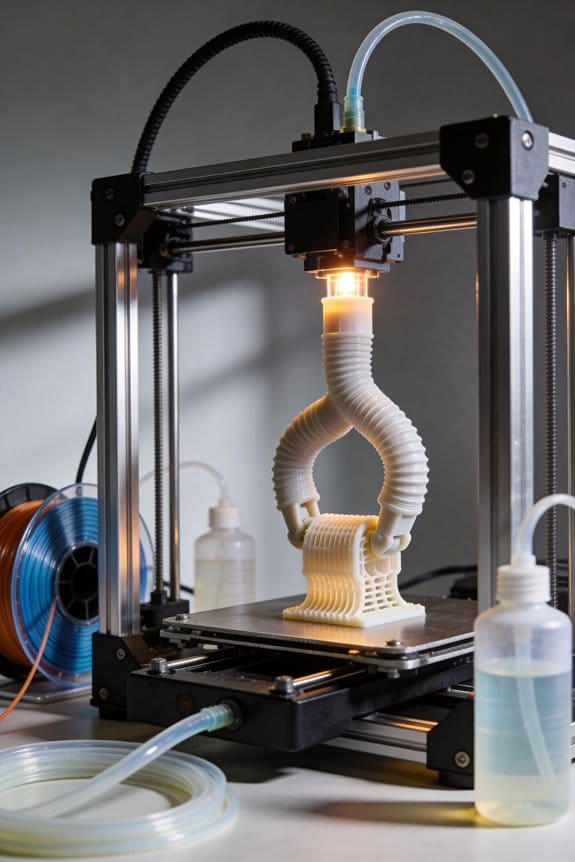
RepRap is an open-hardware 3D-printer project anyone can copy, modify, and share. For example, a teacher in Ohio printed custom robot parts for a classroom set, saving $300 per kit. The project uses fused filament fabrication: melted plastic is pushed through a nozzle and deposited layer by layer. Typical layer heights you’ll see are 0.1–0.3 mm, and print speeds range from 30–80 mm/s depending on quality. Because RepRap designs are meant to print many of their own parts, you can replace broken brackets and gears with parts you printed yourself, cutting lead time from weeks to hours.
Why this matters: open licensing lets communities improve designs fast, lowering costs for beginners and startups.
RepRap accepts varied feedstocks like PLA, ABS, and experimental composites. For example, a hobbyist in Berlin printed a garden hose holder from PETG that survived winter weather for two seasons. If you try PLA, expect lower warping and easier printing; if you try ABS, expect more heat resistance but use an enclosure to reduce warping. Some printers accept flexible filaments too; speed for TPU should be under 30 mm/s and retraction reduced to avoid jams.
Why this matters: choosing the right filament changes durability and use cases.
Because designs and software are openly licensed, communities iterate rapidly and improve reliability. A concrete step you can follow:
- Find a RepRap model on an open repository like GitHub or PrusaPrinters.
- Download the STL files and the Bill of Materials (BOM).
- Print replacement parts at 0.2 mm layer height for a balance of strength and speed.
- Join the community forum to share improvements and get help.
For example, a small bakery in Portland printed custom cookie cutters and replaced a worn extruder lever in an afternoon using that workflow.
Why this matters: you’ll save money and get tailored tools fast.
RepRap Origins: Bowyer’s Vision to Democratize 3D Printing

If you’ve ever watched someone build a gadget from scratch, this is why.
Why it matters: knowing where RepRap started helps you see how affordable 3D printing became possible.
In 2004, Adrian Bowyer wanted to make production cheap enough for you to use at school or in a small shop, so he set out to build a low-cost fused filament fabrication (FFF) machine that could print many of its own parts. He aimed to lower the barrier set by big industrial printers that cost tens of thousands of dollars, and he focused on keeping the bill of materials under a few hundred dollars for the core parts. Example: a basic RepRap kit in early years cost hobbyists roughly $300–$700, versus industrial units costing $20,000+.
Why it matters: knowing his approach shows you the practical trade-offs in DIY printing.
Bowyer secured research funding to test new materials and to publish open designs so you could learn by doing—assembling, calibrating, and modifying a machine teaches mechanical thinking better than just reading a manual. He pushed for open-source schematics and parts lists, so communities could copy, tweak, and share improvements; that meant you could download files, 3D-print replacement parts, or change an axis design and post the results online. Example: a university lab used RepRap schematics to teach a semester-long hands-on course where students each built a printer and swapped extruder designs.
Why it matters: understanding the learning model explains how skills spread.
The project promoted grassroots education by turning complex engineering into a set of repeatable steps you could follow at home or in class:
- Download the RepRap files.
- Source inexpensive motors, rods, and a hot end (expect to spend $150–$400 depending on suppliers).
- Print plastic parts on an existing printer or buy molded ones.
- Assemble, calibrate, and iterate.
This method made engineering tangible—students saw tolerances, filament behavior, and control electronics firsthand. Example: a high school tech club printed spare gears after breaking them during a competition, saving weeks of downtime and teaching quick prototyping.
Why it matters: seeing the community effect shows how affordable manufacturing spread.
Open-source sharing let thousands of hobbyists test new materials, adapt designs for local parts, and spread low-cost desktop manufacturing worldwide. You benefited because improvements—like better bed heating or sturdier frames—arrived as shared files or simple upgrade guides, so you could replicate fixes without reinventing them. Example: an online forum thread helped users in Brazil locally source bearings and reduce costs by 40%, which let a community set up a local makerspace.
If you take one practical lesson from Bowyer’s vision, it’s this: you don’t need a factory to learn manufacturing—start with modest parts, follow open designs, and iterate with your community.
First Prototypes & the Self‑Replication Milestone
Before you build your first self-replicating machine, know why it matters: proving a machine can print useful parts for another machine changes how you think about manufacturing.
Here’s what actually happens when you start with the earliest RepRap prototypes and move to a self-replicating milestone: you begin with a lot of rapid‑prototyped parts, you hunt down affordable filament and fasteners, and you iterate until the printer can produce functional replacements. One concrete example is Darwin: on May 29, 2008 a Darwin printed a full set of parts for another Darwin, and that “child” produced useful components within hours of assembly. That day showed that a hobbyist with a small budget could source PLA or ABS filament for about $20–$30 per kilogram and assemble a working machine from printed parts plus a handful of standard hardware items like M3 screws, NEMA17 stepper motors, and 8 mm smooth rods.
Why assembly ergonomics matter: your hands, tools, and instructions determine whether the build works. If you design parts with generous tolerances—use 0.2–0.5 mm clearance on sliding fits—and give step-by-step photos, you’ll reduce frustration. Example: the first Darwin used a single Phillips screwdriver and five 10–30 minute subassemblies; when builders followed that order, they finished in a weekend instead of several tries.
How to reproduce the milestone yourself, in three steps:
- Source parts: buy one kilogram of filament, four NEMA17 motors, two 8 mm rods (200–300 mm), a RAMPS or similar controller, and a bag of M3/M4 hardware.
- Print core parts: print the frame pieces at 0.2 mm layer height, 30–40% infill; measure and file any tight holes to 0.5 mm clearance.
- Assemble and test: follow a numbered assembly sequence, tighten fasteners to 0.5–1.0 Nm, run a calibration print (20 mm cube) and adjust steps/mm by 1–2% as needed.
What the prototypes taught the community: they showed which parts must remain nonprinted—bearings, motors, and electronics—and which could be printed reliably, like brackets and gears. A practical example: hobbyists found printed idler gears lasted weeks under light use, but steel hobbed pulleys were needed for long-term reliability in high-print-volume setups.
Final practical point: if you want this to work for others, publish clear build photos, a parts list with vendor links, and a one‑page troubleshooting checklist that covers common failure modes—loose belts, underextrusion, and misaligned rods. That’s what turned a single successful run into a global, user-driven manufacturing movement.
Recommended Products

Professional CNC Controller Kit: This is a professional 3d printer DIY kit made of high premium materials. The complete kit includes motor, driver, and power supply. Ideal for DIY projects, small workshops, and light industrial automation.

Please mind the bowden adapter is not included.

To start your first 3D printer with the most cost-effective stepper motor.
Key Breakthroughs: Darwin, Mendel, Huxley

If you’ve ever watched a gadget print itself, this is why those three RepRap machines mattered.
Darwin showed you self-replication was practical, and that matters because it cut the number of bought parts you need. For example, Darwin printed about half of its own components so you could reuse printed gears and brackets instead of buying them. How that helped: 1) you print a set of 20 parts, 2) assemble the core, 3) use that to print the rest — fewer supplier orders. The core lesson: aim to print at least 40–50% of parts to make a follow-up build realistic.
If you’ve ever struggled with a floppy printer frame, this is why Mendel mattered. Mendel simplified the frame into a triangular-prism shape, and that matters because the geometry increases rigidity with fewer fasteners. A real-world example: swap a rectangular frame for a triangular prism and you’ll see less Z-wobble when printing tall, thin models like a 150 mm vase. Practical steps: 1) cut three identical frame plates, 2) bolt them at 60° angles, 3) mount the linear rods to the triangular vertices. The result: steadier prints for the same amount of assembly effort.
Think of compactness like packing a toolbox into a lunchbox. Huxley shrank the RepRap, and that matters because it lowered material cost and made the machine portable without losing print quality. For instance, Huxley used shorter rods and a smaller build plate (around 120 × 120 mm), so you could carry the printer in a backpack and still print functional parts like small brackets or phone holders. If you want to copy that approach: 1) reduce X/Y travel to 120–150 mm, 2) use lighter extrusions or rods, 3) choose a compact heated bed or none at all to cut cost.
Together, these designs teach you three concrete trade-offs: print the largest share of parts you can (target 40–50%), design the frame for stiffness with simple geometry (triangles work), and shrink only until the build volume still fits your common prints (measure your typical print first).
How Open Source Fueled Rapid Design Evolution

If you’ve ever watched a hobby project turn into something bigger, this shows why openness matters.
Why it matters: openness turns your solo tinkering into shared progress that scales fast.
Because RepRap published designs and code openly, you could see exactly how improvements spread through hardware and software. For example, someone in Croatia printed a new extruder on Monday and posted photos by evening; by Wednesday others had printed and tested it, reporting temperature and flow differences. That quick feedback loop let you test ideas the same day using rapid prototyping: print a part in 3–6 hours, swap it onto your printer, and run a calibration print in 30 minutes.
How you benefit practically:
- Try a tweak fast: download the updated STL or G-code, print the part, and install it. Most prints took under six hours.
- Swap components: people traded electronics boards (e.g., RAMPS to Duet) and motors, then uploaded wiring diagrams and firmware snippets so you wouldn’t have to reinvent them.
- Reuse designs under open licenses: because designs were re-usable, you could fork a project without legal hassle and test a new frame or motion system.
Why modular firmware matters: modular code makes updates less risky and faster to apply.
Real example: a developer split firmware into motion control, temperature control, and UI modules; when someone improved PID tuning for hotends, you only replaced the temperature module and ran three prints to verify. That change cut debugging time from weeks to days. Steps to use modular firmware:
- Identify modules your printer uses (motion, temperature, UI).
- Download the updated module files and backup your current firmware.
- Flash the single module and run the standard calibration prints (first-layer, temperature tower, and a small geometry test).
Why forks and experimentation help you: forks let different ideas compete so good ones win.
Concrete case: a fork changed the kinematic layout from Cartesian to CoreXY; within two months there were build guides, part lists, and motion-tuning notes so you could decide whether to convert your printer. If you want to test a fork, follow these steps:
- Compare the BOM (bill of materials) to your current parts.
- Print the required adapters overnight.
- Assemble, then run a 20–30 minute motion calibration.
Why openness lowers your risk: open licenses let you copy and adapt without asking for permission.
Real example: a maker reused a drive-gear design under an open license, improving tooth profile and sharing the CAD; dozens of users adopted it, and failure rates dropped by measurable amounts in forum reports. To adopt a shared part:
- Check the license (e.g., GPL, MIT, Creative Commons).
- Verify tolerances in the shared CAD (measure key dimensions).
- Print with specified settings and test under the stated load.
In short, when designs and code are open you get fast prototyping cycles, modular upgrades that isolate risk, and community-tested forks that let you choose proven directions. If you follow the numbered steps above, you’ll move from tinkering to reliable improvements in days rather than months.
Recommended Products

The MK4 is the latest edition of our flagship 3D printing workhorse. It combines the reliability and safety features of its predecessors with high-speed performance enabled by Input Shaper support. It brings plenty of new features like a perfect smooth first layer thanks to the Loadcell sensor (no manual adjustments needed).

[REWARDING DIY BUILD EXPERIENCE] Assemble your own high-performance 3D printer with a detailed step-by-step guide designed to teach the mechanics and electronics of professional 3D printing.

CoreXY, High Speed Printing: Creality K1C 3D Printer is a new upgrade to the K1, K1 SE and K1 Max. It inherits the K1's lightweight and compact CoreXY system; with speeds of up to 600mm/s, accelerations of up to 20,000mm/s and vibration resistance; it can print at high speeds while maintaining excellent print quality;12 times faster than a typical 3D printer.
Community Dynamics: Volunteers to Global Networks
If you’ve ever joined a volunteer project and wondered how it turns into something that works worldwide, this shows you how it happens and why it matters in one sentence: turning casual help into a reliable global network keeps innovation alive and prevents single points of failure.
I watched the RepRap community grow from kitchen-table builds into an international network that coordinates design, testing, and documentation. A concrete example: volunteers used a shared Git repository where one person submitted a parts redesign, three others ran test prints, and a fourth updated the assembly guide with new photos, all within a week.
Why this matters: without coordination, contributions pile up and useful work gets lost. How you start coordinating:
- Create one shared repo (GitHub/GitLab) and one discussion forum (Discourse or a dedicated Slack/Matrix channel).
- Make three labels for issues: “design”, “testing”, “docs”.
- Assign a volunteer lead for each label for two-week sprints.
Rotate leads every 2–4 sprints.
Volunteer fatigue is real; you’ll see it when tasks stagnate and people stop answering threads in a month. A concrete example: a lead who handled testing for six months stopped replying, and nine pending PRs sat unmerged until responsibilities were rotated and tests automated.
Why fixing burnout matters: keeping people engaged keeps the project moving. How you reduce burnout:
- Limit any volunteer lead to 2 months or 4 sprints.
- Schedule one-hour weekly syncs with an agenda of at most five items.
- Document every workflow as a single README file with step-by-step checklists and one screenshot per step.
As the network scales, you need rules for contributions, licensing, and quality so you don’t lose trust. A specific example: the project adopted an Apache 2.0 license in a single recorded vote and added a CONTRIBUTING.md that required PRs to include a test or a photo, which cut review time from days to hours.
Why governance matters: clear rules speed reviews and prevent legal headaches. How you set simple governance:
- Publish a short charter (one page) that lists contribution rules and the decision process.
- Use a lightweight review process: two approvals required for non-trivial PRs, one approval for simple typo fixes.
- Keep licensing upfront: display the license file in the repo root and mention it in the CONTRIBUTING.md.
To preserve knowledge and keep innovation distributed, structure teams around modules and make onboarding explicit. Example: split the printer into three teams—frame, electronics, firmware—each with a five-item checklist for new contributors, including “build this test jig” and “run these three prints.”
Why modular teams matter: they let people own parts without needing to know everything. How to run modular teams:
- Define teams by module and publish one-page team guides.
- Keep team size under 10 contributors active at a time.
- Create automation: run a CI job that prints a small calibration file and uploads the result image.
Finally, measure and adjust with small signals so you can react fast. Example: track average PR response time weekly; if it exceeds 7 days, open a rotation for additional reviewers.
Why measuring matters: it gives you an early warning of slowdowns. How to measure:
- Record PR response time and number of active contributors weekly.
- If active contributors drop by 25% month-over-month, trigger a recruitment push with one outreach post and one onboarding session.
- Review these metrics at the end of each two-week sprint.
Follow these specific steps, and your volunteer effort can scale into a resilient global network without burning people out or losing the ability to innovate.
Early Adoption Waves: Hobbyists to Mass Deployment
Think of grassroots tech like a rumor that turns into a neighborhood workshop.
Why this mattered: you could build a working 3D printer for under $500 and then teach three friends to do the same. I watched the RepRap project start with hobbyists tinkering at home; people took photos of their machines and posted wiring diagrams, firmware tweaks, and part lists that you could copy overnight. In one town a meetup started in a garage where someone brought a printed gear and handed out a checklist of parts: Ramps board, 12V supply, NEMA17 motors, and a 0.4 mm nozzle. That checklist let others replicate the build in weekend sessions.
Before explaining how it spread, know why community meetups mattered: they turned guessing into repeatable fixes in hours, not months. Local groups formed where you showed prints, traded parts, and learned maintenance face-to-face; those meetings usually lasted two hours and had three rotating demos—calibration, filament loading, and firmware flashing. An example: a Saturday makerspace session where a teacher demonstrated bed leveling, then handed you a printed jig to take home.
How the transition to schools and small sellers happened, and what you can do:
Why this matters: connecting hobbyists to schools scaled hands-on learning quickly.
- Start by contacting one local makerspace and offering a 45-minute demo on printing a simple model like a phone stand.
- Bring one kit: an assembled printer, 1 kg of PLA filament, and a troubleshooting sheet with five common fixes.
- Run three classroom sessions so students can each slice, print, and post-process a part.
Real example: a community center partnered with a high school and scheduled three weekly labs; by the third week students were designing simple brackets for a robotics club, and the center ordered two more printers based on demand.
How open design let tweaks spread:
Why this matters: sharing plans means a fix you invent can save dozens of builds.
- Step 1: Post a zipped file with labeled photos, a parts list with prices, and the firmware configuration.
- Step 2: Tag the post with the printer model and the specific problem you fixed (for example: “XYZ printer — improved bed adhesion fix”).
- Step 3: Note the exact change: replace a 20 mm cooling fan with a 30 mm fan and add a 5 mm spacer to move it 8 mm away from the hotend.
Real example: someone posted a modified extruder gear file and a photo showing the gear installed; within two weeks three small sellers adopted it and included the printed gear in their kits.
A few practical outcomes you can expect:
- Within a year, dozens of community members will build reliable machines if each meetup documents one successful tweak per session.
- When a tweak reduces calibration time from 45 minutes to 15 minutes, more people will buy or build printers because the perceived effort drops.
If you want to reproduce this in your area, follow these numbered actions:
- Host a one-hour meetup with a working machine and a parts checklist.
- Run a 45-minute school demo using a simple print (phone stand).
- Publish your build files, photos, and a short troubleshooting list online.
Example result: one organizer followed these steps and grew from five hobbyists to a 30-person makerspace membership in under eight months.
Recommended Products
2.2 Nm Strong Torque Performance: This NEMA 23 stepper motor kit delivers powerful performance with high torque, ensuring reliable, precise and smooth movement during engraving and cutting for woodworking. The torque is 2.2 Nm, a 400% increase over the original NEMA 17 stepper motor.

【PACKAGE INCLUDES】 Fully functioning control system including one UIM2513 RS232-CAN gateway, one NEMA 17 all-in-one integrated smart servo stepper, one NEMA 23 integrated servo stepper motor, a power supply, UIM342 U/O board, cables, and accessories.

Discover the Possibilities: The Genmitsu 4th Axis Rotary Module Kit is a drop in upgrade that enables your 4040-PRO CNC machine to carve from different angles and positions or with the right software full 3D rotary carving. The 4th axis allows for the creation of complex parts with curved or angled features that are not achievable with a traditional 3-axis CNC machine.
Commercial Ventures Spawned by RepRap
If you’ve ever watched a garage project turn into a real product, this is why.
Why it matters: turning open-source RepRap designs into businesses made 3D printing affordable and reliable for schools and makerspaces.
I saw hobbyists form startup spinouts that packaged RepRap kits with improved electronics and clear user guides. One example: a small UK shop that took a RepRap frame, swapped in a reliable mainboard and pre-soldered the harnesses, then sold kits that teachers could assemble in a single afternoon. Step 1: source a tested controller board. Step 2: pre-assemble wire looms. Step 3: include a 2‑page teacher guide with photos.
These companies standardized parts, provided warranties, and supported customers, which made buying a 3D printer less risky. Imagine a community member buying a kit, getting a one-year warranty, and calling support when a hotend clogs; that warranty reduced the hassle enough for dozens of schools to take the plunge.
Retail ecosystems grew around filament suppliers, replacement parts, and online marketplaces, creating steady revenue streams beyond one-off sales. For example, a filament shop photographed color swatches, sold 1‑kg spools in matte PLA and PETG, and offered 10% subscription discounts — predictable monthly income followed. Steps for a filament vendor: 1) test materials on three printer models, 2) photograph swatches under daylight, 3) set up a subscription option.
While some ventures added closed features to monetize, many kept core openness, licensing software and sharing hardware improvements, which accelerated innovation and lowered costs for new entrants. A visual example: an open-source extruder design posted to a forum, forked by three small manufacturers, each reducing part count and selling the improved version for $15–$35, pushing prices down industry-wide. Steps a new entrant should follow: 1) find an open design with community endorsements, 2) make one reliable improvement, 3) release the change and offer paid kits.
Recommended Products
30-in-1 No-Solder Sensor Board, Plug and Play: Integrates 30 functional sensors including temperature & humidity, ultrasonic ranging, gas and motion sensors. Innovative common board design requires no soldering or complex wiring, and comes with a full set of accessories like 128G SD card, adapter board and acrylic mounting plates for zero-threshold experiments

Unleash Unlimited Innovation: Discover the GAR Monster Kit, an unparalleled, comprehensive Arduino-compatible development set featuring 5 powerful main boards: Uno R3, Mega 2560, Nano V3, ESP32 WiFi+Bluetooth and ESP8266 NodeMCU, enabling a vast spectrum of robotics and IoT projects.
![Official Arduino Starter Kit [K000007] - 12 DIY Projects with Electronic Components & English Projects Book - Original Kit from Italy](https://m.media-amazon.com/images/I/51fPv6DsjQL._SL500_.jpg)
Complete DIY Electronics Kit – The Official Arduino Starter Kit includes everything you need to begin exploring the world of electronics and programming, featuring 12 hands-on DIY projects that teach key concepts in coding and circuit design.
Modern RepRap Practices and Future Directions
Before you build or upgrade a RepRap, you need to know why these practices matter: they make your prints reliable and reduce wasted filament and time.
Modern RepRap mixes careful design, shared documentation, and repeatable testing so your printer actually works when you need it. For example, a community-validated Prusa-style build guide will show you exact torque specs for M3 bolts, bed leveling probe offsets, and the correct belt tension (tighten until a 30 mm span deflects 2 mm). Follow that guide step by step.
Why you should calibrate: calibration fixes dimensional errors and adhesion so your parts fit and don’t peel. Do this routine before printing functional parts:
- Print a 20 mm calibration cube at 0.2 mm layer height with 50 mm/s speed.
- Measure X, Y, Z with calipers and adjust e-steps and steps/mm if the measurements are off by more than 0.2 mm.
- Run a PID autotune for the hotend (M303 S210) and save with M500.
Real-world example: after doing these three steps on a cheap Prusa clone, one user reduced hole-size errors from 0.6 mm to 0.1 mm and stopped failed first layers.
You should adopt testing protocols so problems are caught early and fixes scale across the community. Use these three simple tests weekly:
- First-layer square (50 x 50 mm) at print temperature to confirm bed adhesion.
- Overhang test (45°, 60°, 75°) to check cooling.
- Tensile strip for flexible filament if you print TPU more than twice a month.
A local makerspace printed an overhang tower and discovered their part-cooling duct was misaligned, fixing it saved them two wasted rolls of filament.
Material choices change what you’ll make and how you print, so pick settings for each filament and document them. For PLA: 200–210°C, bed 50–60°C, print speed 40–60 mm/s. For ABS: 230–250°C, bed 90–110°C, enclosure heated to ~40°C. For TPU: 220–235°C, slowed to 20–30 mm/s, direct drive recommended. If you start printing carbon-fiber–filled PETG, switch to a hardened nozzle and log nozzle life after every 200 g to avoid clogging.
Contribute your results back to shared repositories because reproducible data helps everyone. Use these steps:
- Create a small report with printer model, firmware version, filament brand, slicer and settings, and photos.
- Upload the gcode and measured dimensions.
- Tag the build guide or GitHub issue so maintainers can merge fixes.
A community member uploaded a slicer setting that cut stringing by 80% for a common PETG brand; people replicated it within days.
You also need sensible policies so open designs remain usable and safe. Support local recycling programs for failed prints, follow basic electrical safety (use fused power supplies and enclosures for mains wiring), and respect third-party IP when remixing designs. For a small manufacturer, labeling printed parts with material and print date helped them track failures and comply with local product-safety checks.
If you follow these concrete steps — follow a validated build guide, run the three calibration actions, perform weekly tests, document filament settings, and submit results — your RepRap work will be more reliable and useful to others.
Frequently Asked Questions
How Did Reprap Influence 3D Printing Safety Standards and Regulations?
I influenced regulators by exposing regulatory gaps and forcing dialogue; I pushed a nascent safety culture through community guidelines, hobbyist best practices, and activist advocacy that shaped voluntary standards and later formal regulations.
Were Any Legal Disputes Over Reprap Intellectual Property Significant?
Yes and no: I’m torn between pride and frustration — patent disputes arose but weren’t catastrophic; licensing controversies flared occasionally, yet RepRap’s open ethos and community cooperation mostly defused major legal battles and kept innovation flowing.
What Environmental Impact Does Desktop 3D Printing From Reprap Have?
I think RepRap desktop 3D printing reduces shipping emissions but raises material waste and energy consumption concerns; I try to minimize waste with recycled filaments, efficient slicing, and batch prints while monitoring printer power use to lower my footprint.
How Did Educational Institutions Integrate Reprap Into Curricula?
They integrated RepRap into curricula by adopting maker education labs where I taught hands on prototyping, using RepRaps for student projects, cross-disciplinary design courses, lab modules, and open-source assignments that built technical and creative skills.
Did Reprap-Powered Businesses Face Supply Chain Challenges?
Right off the bat: yes — I faced supply chain headaches. To keep my business afloat, I leaned on supply resilience and creative part sourcing, often scraping together components or redesigning parts to stay ahead of shortages.