As an Amazon Associate, we earn from qualifying purchases. Some links on this site are affiliate links at no extra cost to you. Our recommendations are based on thorough research and editorial judgment.
Wood and Metal-Filled Filaments: Balancing Aesthetic Blends With Structural Integrity
You just finished a print and can’t decide whether that grainy, brown finish or the cold, heavy look would suit your prototype — should you use a wood-filled PLA or a metal-filled filament?
You’re staring at the part’s function and appearance and can’t tell which blend will give the right stiffness, weight, and finish without causing nozzle damage or brittle failure.
Most people assume any specialty filament prints like standard PLA and skip adjustments, leading to clogged nozzles, poor layer bonding, or disappointing finishes.
This article will show you exactly which filament to choose based on the look, strength, and post-processing you need, and how to set print temperatures, nozzle type, cooling, and finishing steps so the part looks right and performs safely.
You’ll also get quick testing steps to verify results before committing to a full print.
It’s easier than it sounds.
Key Takeaways
Here’s what actually happens when you pick between wood- and metal-filled filaments: your choice changes how the part looks, how heavy it is, and how you must print it.
– Choose wood-filled when you want a natural, grainy appearance and slightly higher stiffness for decorative, low-impact parts; choose metal-filled when you need a metallic look, extra weight, or electrical/thermal conductivity. Example: use wood-filled PLA for a 3D-printed coaster with visible grain, and use bronze-filled PLA for a prop weight for a cosplay sword.
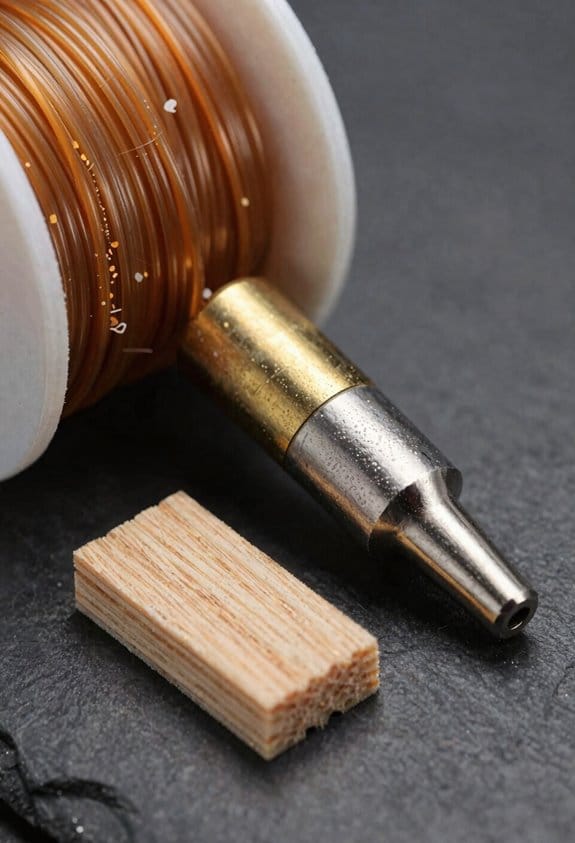
Before explaining how to print abrasive filaments, know why you must protect your tools: the abrasive particles will wear brass nozzles quickly and can weaken thin walls over time.
- Use a hardened steel or ruby nozzle.
- Increase wall thickness to 1.2–2.0 mm (or 3–6 perimeters).
- Set infill to 20–40% for display parts and 50–70% if the part must carry load.
- Slow printing speeds to 30–40 mm/s for reliable extrusion.
Example: printing a wood-filled picture frame, use a 0.6 mm hardened nozzle, 3 perimeters, 30% infill, and 35 mm/s.
Before you dial temperatures, know why starting mid-range saves time: it reduces clogging and stringing while you tune other settings.
- Start at the filament maker’s mid-range temp, then print a 20 mm calibration cube.
- If layers don’t bond, increase by 5 °C and reprint; if you see oozing or burnt fibers (wood), drop by 5 °C.
- For cooling, set wood-filled fan to 30–50% and metal-filled to 0–20% to balance finish versus adhesion.
Example: if manufacturer lists 200–230 °C, begin at 215 °C and test a 15–20 minute print.
Before you post-process, know why the right finishing method changes appearance and durability: wood needs sealing to avoid moisture uptake, and metal fillers need polishing to show shine.
- For wood-filled prints: sand progressively with 120, 240, 400 grit; then seal with a coat of polyurethane or shellac.
- For metal-filled prints: wet-sand with 400, 800, then 1200 grit; polish with metal paste wax or jeweler’s rouge.
- Expect metal-filled parts to be heavier and consider applying a clear lacquer to slow oxidation.
Example: finish a wood-filled lamp base by sanding to 400 grit and brushing on two coats of satin polyurethane.
If you’re planning sintered metal parts, know why you must compensate for shrinkage: the sintering stage reduces dimensions by a predictable percentage.
- Design parts 15–25% oversize depending on the alloy and binder system—check your powder supplier for exact shrinkage.
- Print and debind following vendor protocols, then use a controlled sintering ramp (for example, ramp at 5–10 °C/min with holds at binder burnout and sintering temps).
- Print oversized test pieces first and measure them after sintering before committing to final parts.
Example: for a stainless steel sinter job with 20% shrinkage, a 100 mm shaft should be printed at 125 mm, then measured post-sinter to confirm final size.
Quick Decision: When to Choose Wood vs Metal Filament
Here’s what actually happens when you pick a filament for a quick project: appearance, function, and printer wear decide the outcome.
When you want a natural look, pick wood filament because it prints like PLA and usually needs no hardware changes. Why it matters: you save setup time and avoid swapping nozzles. Example: print a 150 mm decorative bowl in 6–8 hours on a stock Creality Ender 3 with a 0.4 mm nozzle, and you’ll get visible grain with light sanding. Steps to prepare:
- Set nozzle temp to 200–220°C and bed to 50–60°C.
- Use a 0.4–0.6 mm brass nozzle; avoid hardened steels.
- Sand with 120–220 grit after cooling for a softer finish.
Choose metal filament when weight, metallic finish, or higher part density matters. Why it matters: the part’s function may require a heavier or stone-like feel. Example: print a 50 mm medallion for a prop that needs heft—metal-filled PLA gives weight but will wear a standard nozzle in about 1–3 spools. Steps to prepare:
- Buy a wear-resistant nozzle (hardened steel or ruby-tipped) before printing.
- Set nozzle temp to 210–230°C and bed to 50–70°C.
- Plan post-processing: polishing or light filing, and for sinterable mixes, schedule sintering time per manufacturer.
If you care about costs, compare spool and tooling prices directly because materials and nozzles change upfront expenses. Why it matters: your project budget must include consumables plus maintenance. Example: a 1 kg wood-filled PLA spool is often $20–$35, while a 1 kg metal-filled spool is $50–$120; a hardened nozzle adds $10–$60. Steps to compare:
- List material price per kg and expected spools used.
- Add nozzle cost divided by expected spool count (e.g., $30 nozzle / 10 spools = $3 per spool).
- Total those to get per-project material cost.
Consider part performance, printer compatibility, and how much maintenance you’ll accept before deciding. Why it matters: a mismatch wastes time and money. Example: if you need functional gears that will bear load, metal-filled PLA may sag under stress compared with nylon blends; test a single gear before printing a batch. Steps to evaluate compatibility:
- Check your extruder type (direct vs Bowden) and max temp.
- Run a 20–30 minute calibration print to watch for clogging or grinding.
- Inspect the nozzle after that print for wear; replace if roughness appears.
Quick checklist — one glance decision:
- Want natural wood look, easy prints, low wear? Use wood filament.
- Need weight, metallic finish, or density? Use metal-filled, but buy a hardened nozzle and allow post-processing time.
- On a tight budget? Use wood filament or factor nozzle wear into the metal filament cost.
Final practical tip: if you only need the metallic look, try painting or metallic spray on standard PLA — it’s cheaper and avoids nozzle wear.
Wood vs Metal Filaments: Composition, Feel, and Finish

The difference between wood- and metal-filled filaments comes down to what’s mixed into the plastic base.
Why this matters: the filler changes weight, abrasion, smell, and how the final print looks. For example, if you print a 100 mm vase with 20% wood-PLA, it’ll feel noticeably lighter than the same vase printed with 70% bronze-filled PLA.
Composition and what that means for you:
- Wood filaments blend about 20–40% fine wood particles with PLA, so you’ll get a lighter, less abrasive filament that prints on standard nozzles.
- Real-world example: a 150 mm decorative box printed at 0.2 mm layer height with 30% wood-PLA sands nicely and takes stain like wood.
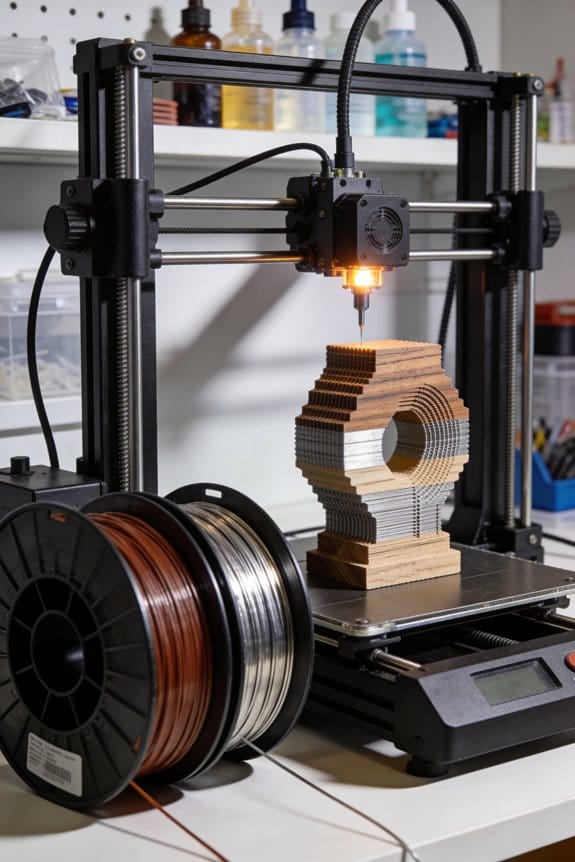
- Metal filaments mix dense metal powders (bronze, copper, steel) into the polymer, often raising filler content to 50–80%, which makes the filament heavy and abrasive.
- Real-world example: a 50 mm gear printed in copper-filled PLA will feel noticeably heavier and will wear a brass nozzle if you don’t switch to hardened steel after ~1–2 kg of printing.
Feel and finish:
Why this matters: touch and appearance affect whether a piece feels like wood, metal, or plastic.
- Wood prints feel warm and slightly porous, which helps you simulate grain; you can enhance that by sanding with 120–220 grit and applying a thin coat of wood stain.
- Real-world example: sanding a wood-PLA phone stand with 180 grit, then brushing on Danish oil, gives a realistic timber look.
- Metal prints feel cool and solid with a matte metallic sheen right off the printer; to get a polished metal look, you’ll need steps like wet sanding and buffing with polishing compound.
- Real-world example: wet-sanding a bronze-filled statuette from 400 to 1200 grit, then buffing with rouge, produces a bright metallic finish.
Scent and print setup:
Why this matters: smell and handling affect where you print and what settings you choose.
- Wood filaments release a pleasant woody aroma while extruding and usually print at standard PLA temps (190–220°C). Use 0–10% more extrusion multiplier if you see gaps.
- Metal filaments often smell neutral; they typically require higher temps (200–230°C) and can clog or wear nozzles faster. Replace brass nozzles with a hardened steel nozzle after about 1–2 kg of metal-filled filament.
Post-processing options and concrete steps:
Why this matters: the right post-processing delivers the final look you want.
- For wood-PLA pieces:
- Sand with 120→220 grit.
- Apply wood stain or Danish oil with a cloth; wipe after 5 minutes.
- Seal with a spray polyurethane if outdoors.
- Example: a 200 mm planter finished this way resists water better.
- Start with 400 grit wet sanding.
- Move to 800–1200 grit for a smoother base.
- Buff with polishing compound or use a rotary tool for shine.
- Example: polishing a 60 mm coin replica yields a reflective face and matte edges.
Final tip: match filament to the job—use wood-filled for lightweight, timber-like decor and metal-filled when weight and a real metallic feel matter—and swap to a hardened nozzle if you print more than a couple kilograms of metal-filled filament.
Printing Checklist: Temps, Cooling, Bridging, Retraction & Nozzles
Before you start tuning print settings, know that getting them right keeps your prints strong and looking like the material you chose.
Because settings change how wood- and metal-filled filaments behave, start at the filament maker’s mid-range temperature and adjust in 5°C steps based on how the filament flows and how the surface looks. For example, if a 200°C starting point feeds too slowly and leaves gaps, raise to 205°C and re-test a 20 mm cube extrusion; if the surface darkens noticeably, drop 5°C. Use 5°C adjustments so you can see clear changes without overshooting.
Why cooling matters: it controls surface detail and layer bonding in opposite ways. For wood blends, set the part cooling fan to 30–50% to keep grain detail sharp; for instance, when printing a small wooden figurine at 0.2 mm layer height, 40% fan preserved visible grain without cracking. For heavy metal mixes, reduce or turn off the fan (0–20%) to prevent poor layer adhesion—when I printed a brass-filled gear, turning the fan to 10% eliminated cracking between teeth.
Bridging affects sag and finish; metal-filled parts sag more under their own weight. Test short bridges first because long spans amplify issues. Steps:
- Print a 20 mm bridge and inspect sagging.
- If sag >1 mm, lower print speed by 20% and add 5–10% fan for short bridges only.
- For long spans, design with supports or add ribs to transfer load.
Retraction prevents stringing but can starve the hotend if set too aggressively. Why this matters: stringing ruins fine details and clogs happen with over-retraction. Start with 20–30 mm/s retraction speed and 2–6 mm retraction distance for Bowden setups (try 4 mm first). Example: on a filament with fine wood particles, 25 mm/s and 4 mm stopped strings while keeping extrusion steady.
Nozzle choice affects wear and detail. Use wear-resistant nozzles for abrasive filaments — a hardened steel or ruby-tipped nozzle lasts hundreds of hours longer than brass when printing metal- or wood-filled blends. For detailed wood grain, a 0.4 mm hardened nozzle is a good balance; for faster metal-filled prints, use 0.6–0.8 mm hardened nozzles to reduce clog risk.
Quick checklist (follow in order):
- Set temp to manufacturer mid-range.
- Adjust ±5°C based on flow and finish.
- Fan: wood 30–50%, metal mixes 0–20%.
- Test bridges starting at 20 mm; reduce speed if sagging.
- Retraction: 20–30 mm/s, 2–6 mm (start 4 mm for Bowden).
- Use wear-resistant nozzles; choose 0.4 mm for detail, 0.6–0.8 mm for heavy mixes.
If you follow these steps, you’ll avoid common failures like sagging bridges, stringing, and nozzle wear while keeping the look of wood tones or metal finishes consistent.
Mechanical & Dimensional Differences: Strength, Stiffness, Impact, Warping
Think of mechanical behavior like how a tool feels in your hand: it matters for fit and function.
Why this matters: if a printed part breaks or warps, your project fails. For example, a decorative wooden-looking vase may crack if you try to use it as a hammer handle.
1) How do wood-filled filaments behave mechanically?
Why it matters: you want parts that look like wood to not fail under stress.
– Wood-filled prints are usually stiffer but more brittle than plain PLA.
Example: a 3D-printed wood lamp shade will flex less but can snap if dropped from a table height.
– Expect higher tensile modulus but lower elongation at break and reduced impact resistance.
Tip: print at 0.2–0.3 mm layer height and 10–20% infill for decorative items.
– Use thicker sections (3–5 mm) and fillets of 1–2 mm where loads concentrate.
2) How do metal-filled filaments change strength and wear?
Why it matters: you might gain weight and stiffness but wear out your nozzle faster.
– Metal-filled parts add density and can increase static strength, but they may lower fatigue life under repeated loading.
Example: a metal-filled bracket used to hold a doorstop might last under steady load but crack after thousands of cycles.
– Use a hardened steel or ruby nozzle; expect nozzle life to drop with standard brass.
Tip: print at 200–220°C depending on the base polymer and reduce print speed to 30–40 mm/s.
3) How does thermal expansion affect warping and layer adhesion?
Why it matters: mismatch in expansion causes layer separation and distorted shapes.
– Materials with denser fillers often have different coefficients of thermal expansion, causing stress when cooling.
Example: a dense metal-composite chess piece can warp at the base and separate between layers after cooling on a cold bed.
- Controlled cooling and a heated bed at 40–60°C help; use an enclosure for parts over 50 mm in any dimension.
- For dense composites, print slower, keep ambient temperature steady at 25–35°C, and use brim widths of 5–10 mm for flat bases.
4) Specific steps to minimize problems
Why it matters: following steps prevents failed prints and saves time.
- Use a hardened steel or ruby nozzle for metal-filled filaments.
- Set nozzle temp per filament data, usually 200–230°C for metal composites; lower temps for wood blends (180–210°C).
- Print slower: 30–40 mm/s for metal-filled, 30–60 mm/s for wood-filled.
- Use thicker walls (2–3 perimeters) and infill 10–30% depending on function.
- Add 1–2 mm fillets at internal corners and make critical sections 3–5 mm thick.
- Control cooling: fans 0–30% for first 3–5 layers, then 30–60% for wood; 0–20% for metal composites.
- Bed adhesion: use 5–10 mm brim, glue stick or PEI sheet, bed temp 40–60°C.
- Use an enclosure for parts larger than 50 mm to reduce warping.
5) Quick design trade-offs
Why it matters: you’ll choose the right filament for the right job.
- Choose wood-filled when appearance and stiffness matter but not impact resistance; make parts thicker and decorative.
- Choose metal-filled when mass and a heavier feel are desired, and use wear-resistant hardware and slow print speeds.
End detail: if you follow nozzle choice, temps, slower speeds, thicker sections, and controlled cooling, you dramatically reduce breakage and warping in wood- and metal-filled prints.
Post-Processing & Uses: Sanding, Staining, Sintering, and Practical Applications
If you’ve ever finished a print and wondered what makes it look finished, this is why.
Why it matters: good post-processing turns a rough print into something you can use or display. For example, after sanding and staining a wood-filled vase I printed, the grain showed through and it matched my bookshelf.
Wood-filled filament — how and why
Why it matters: sanding and staining bring out the wood grain and hide layer lines, so your piece looks like real wood. Example: a 120 mm tall decorative vase printed with 0.2 mm layer height became cabinet-ready after finishing.
Steps:
- Sand progressively: start with 180 grit for big imperfections, then 320, and finish at 600 grit for a smooth feel.
- Clean: blow off dust, then wipe with a lint-free cloth dampened with mineral spirits.
- Stain or varnish: apply a wipe-on stain with a cloth, let it sit 5–10 minutes, wipe excess, then cure 24 hours. Use a spray polyurethane for protection — two thin coats with 2 hours between coats.
Tip: if you want visible grain, sand along the layer lines, not across them. The final piece will be lighter and about 2–5% smaller in perceived detail due to sanding.
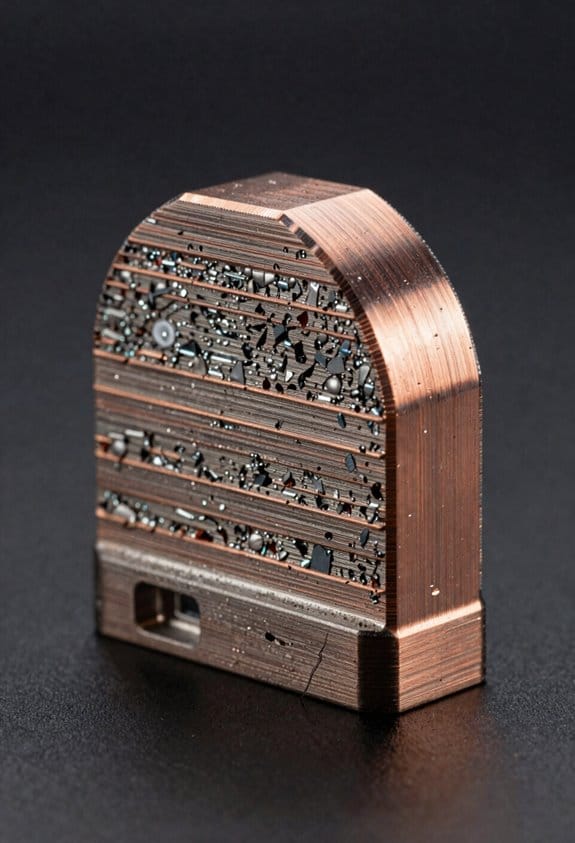
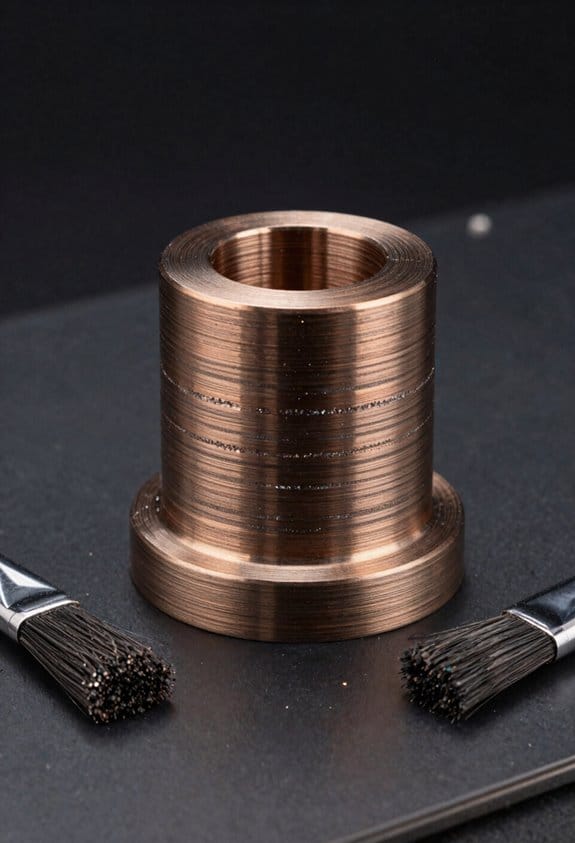
Metal-filled filament — how and why
Why it matters: metal-filled prints can look and feel metallic, but they behave differently depending on whether you stop at surface finishing or go on to sinter. Example: a 50 mm steel-filled weight left as printed polished to a dull metallic sheen; the sintered version weighed three times more and conducted electricity.
Steps for surface finish (no sintering):
- Lightly sand with 220–400 grit, then polish with a metal polish and a soft cloth.
- Seal with a thin spray lacquer to prevent oxidation if the metal is reactive.
Steps for sintering (to get real metal density):
- Follow manufacturer prep: debind per their solvent or thermal schedule.
- Burn out the binder in a controlled oven ramp following the filament data sheet; typical ramp is 1–2 °C/min up to 500–600 °C depending on binder.
- Sinter in a kiln or furnace under the recommended atmosphere and temperature for your metal powder — for stainless-steel-filled rods that often means 1200–1350 °C for several hours.
- Cool slowly to avoid warping.
Warning: sintering shrinks parts—plan for 15–25% linear shrinkage and print a scaled test piece first.
Practical applications — what to use each for
Why it matters: picking the right finish affects function and cost, so you don’t waste time. Example: I used a wood-filled print for a light-diffusing lamp cover and a sintered metal counterweight in a camera slider.
- Wood-filled: best for decor, props, and prototypes where appearance matters but strength is modest.
- Metal-filled (surface finished only): good for visual metal parts, jewelry mockups, and non-structural conductive pieces.
- Sintered metal: use for weights, counterbalances, bushings, or low-stress conductive components where added density and conductivity matter.
Quick checklist before you start
Why it matters: a short checklist prevents ruined parts. Example: I ruined a sinter attempt by skipping a debinding step and had to reprint.
- Verify filament datasheet for debind/sinter parameters.
- Print a calibration cube scaled for expected shrinkage.
- Wear a respirator and ventilate when sanding or burning binders.
If you follow these steps you’ll save time and get results you actually want.
Frequently Asked Questions
Can Wood Filament Trigger Allergies or Respiratory Issues During Printing?
Absolutely — I worry it can: imagine a wood dusting cloud; I tell you fumes and wood dusting can aggravate allergies or asthma, and VOC exposure may irritate lungs, so I use ventilation and masks religiously.
How Recyclable or Biodegradable Are Metal-Filled Prints?
Metal-filled prints aren’t easily recyclable or biodegradable; I’ll admit they pose recovery challenges and risk material contamination in recycling streams, so I’d recommend specialized metal recovery or treating them as mixed-material waste for proper disposal.
Can Painted or Stained Metal-Filled Prints Rust Over Time?
Of course they can—painted or stained metal-filled prints still rust if metal particles reach the surface; I’d mock your optimism, but instead I’ll urge rust prevention via proper protective coatings like clear sealants, primers, or plating.
Do Wood or Metal Filaments Affect 3D Printer Warranty Coverage?
Yes — I’ll warn you: warranty implications exist because abrasive metal filaments accelerate nozzle wear and can void service on extruder parts; I’d contact the manufacturer first and use hardened nozzles to reduce risk.
Can Wood and Metal Filaments Be Safely Used for Food-Contact Items?
No — I wouldn’t use wood or metal filaments directly for food-contact items; they’re porous and may leach. I’d recommend Food safe coatings and Post print sealing applied meticulously, plus certified testing before any food use.