As an Amazon Associate, we earn from qualifying purchases. Some links on this site are affiliate links at no extra cost to you. Our recommendations are based on thorough research and editorial judgment.

Continuous Liquid Interface Production (CLIP): The Technology Behind Instant Resin Prints
You’ve watched a resin print fail again: sticky bottoms, torn features, or long waits while layers peel apart, and you’re left wondering why prints won’t come out smooth or fast. You want a reliable way to get high-detail parts without repeated delamination and hours of post-processing. Most people assume resin printing must be slow and that sticking is unavoidable, so they tweak exposure times or layer heights without fixing the root cause.
This piece shows how a thin oxygen-rich “dead zone,” patterned UV light, and steady platform motion let parts grow continuously, giving faster prints with smoother surfaces and finer features. I’ll explain how to choose resins, set machine parameters, and verify parts so your next runs succeed. It’s easier than it looks.
Key Takeaways
Here’s what actually happens when you use CLIP to print resin parts: it creates a thin, oxygen-rich “dead zone” at the window so the resin doesn’t stick, letting the part be pulled up continuously while the UV projector cures the pattern just above that zone.
Why this matters: continuous motion avoids the peel step that slows SLA/DLP, so your prints finish much faster and have smoother curves. Example: a 10 cm decorative lamp shade that takes 6 hours on an SLA machine can finish in 40–90 minutes on a CLIP system.
How the process works (simple steps):
- A UV projector shines patterned light through an oxygen-permeable window.
- Oxygen at the window stops the resin from curing in a thin layer — the dead zone.
- The build platform rises continuously while new resin flows in and polymerizes just above that gap.
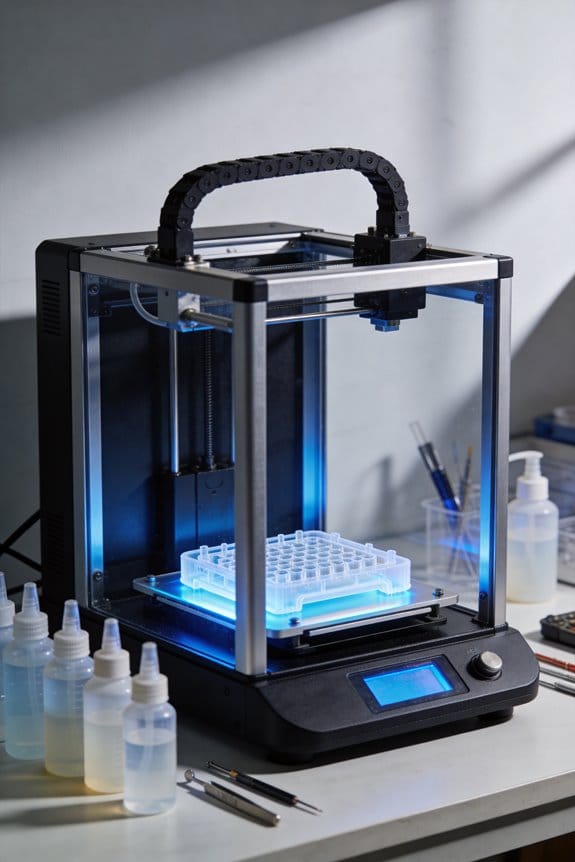
Real-world example: printing small dental models — you set the job, the machine prints without layer lines, and a batch of 10 models that would take a full day on DLP finishes in a few hours.
What speed and surface finish depend on: resin viscosity and cure chemistry control both how quickly you can print and the part’s strength. For fastest prints use low-viscosity acrylates; they cure quickly and often give 2×–10× speedups versus SLA/DLP. If you need toughness or flexibility, pick epoxies or elastomer formulations, but expect slower cures and longer print times.
Example: use a low-viscosity acrylate to print a rigid prototype in 45 minutes; switch to an epoxy blend if you need a durable hinge that will take several hours.
When to choose CLIP and when not to:
- Choose CLIP if you want small production runs or fine-feature end-use parts like dental trays, hearing-aid shells, or jewelry masters.
- Don’t pick CLIP for very large-volume, low-detail runs where FDM or injection molding is cheaper.
- Avoid unverified sub-50 µm feature needs or elastomer parts unless you’ve tested that specific resin and printer combination.
Practical tips for your prints:
- Use low-viscosity resins for speed and thin features; expect faster peel-free cures.
- Test one resin/part combo before committing to a production run; print a 20 mm test coupon and measure dimensions and surface finish.
- Keep the oxygen-permeable window clean and replace it per the manufacturer schedule; a worn window ruins the dead zone and causes sticking.
Example: print a 20 mm calibration cube first, note whether fine edges are crisp, then scale up to a batch.
That’s the core: CLIP gives you continuous, fast, and smooth resin prints by controlling oxygen at the window and tuning resin chemistry to trade speed for durability.
Quick Verdict: When to Choose CLIP

If you’ve ever needed a finished part yesterday, this is why CLIP can help. Why it matters: faster prints mean you can get functional parts into testing or production days sooner instead of weeks. Example: a small tooling shop replaced a 3–4 day SLA turnaround with same-day CLIP prints for jigs, cutting assembly delays by 60%.
Use CLIP when you need speed plus smooth surfaces and reliable strength. CLIP prints continuously, so a part that would take 8–12 hours on a layer-based resin printer can often finish in 1–3 hours depending on size; prints come out with fewer visible layer lines. Pick it for small production runs (5–200 pieces), fine-feature prototypes like snap-fit enclosures, or end-use parts that need near-isotropic mechanical properties rather than parts that only need cheap form-fit mockups. Example: print 50 identical clips with consistent flex and no delamination for a consumer product trial.
Before you start, verify resin choices because they fix your mechanicals and speed. Why it matters: resin viscosity and cure rate determine how fast you can print and how strong the final part is. Example: a 50 cP low-viscosity castable resin prints 30–50% faster than a 200 cP tough resin but will have lower impact strength. Steps:
- Check resin viscosity (aim for <100 cP for fastest CLIP cycles).
- Compare tensile strength and elongation from datasheets to your part spec.
- Run a 1-hour test print of a representative geometry, then post-cure and test fit.
Plan for post-processing because printed parts still need cleaning and curing. Why it matters: uncured resin on surfaces will reduce strength and change dimensions. Example: a small gear printed for a prototype failed prematurely until the team added a 10-minute IPA wash and 20-minute UV cure at 60°C. Steps:
- Rinse in IPA or manufacturer-recommended solvent for 5–10 minutes.
- Dry completely—use compressed air if needed.
- UV post-cure per resin instructions, typically 10–30 minutes at specified wavelengths.
Don’t choose CLIP for every simple piece; it’s not the cheapest for large-volume, low-detail runs. Why it matters: photopolymer resins cost more per kilogram than common thermoplastics, and printers scale differently. Example: for 1,000 injection-molded snap-fits, injection molding beat CLIP on cost per part by 80%. If you need flexible elastomeric parts or ultra-high-resolution (sub-50 µm) features, confirm the specific resin and printer capability first.
Quick checklist before you order a CLIP job:
- Target run size (is it under ~200 parts?).
- Required surface finish and tolerances (specify µm if you can).
- Resin mechanical targets (tensile, elongation).
- Post-processing plan (wash solvent, cure time/temperature).
- One-hour test print scheduled.
Pick CLIP when you want fast turnaround, smoother surfaces, and material properties that behave more like molded parts than layered prints.
What Continuous Liquid Interface Production (CLIP) Is

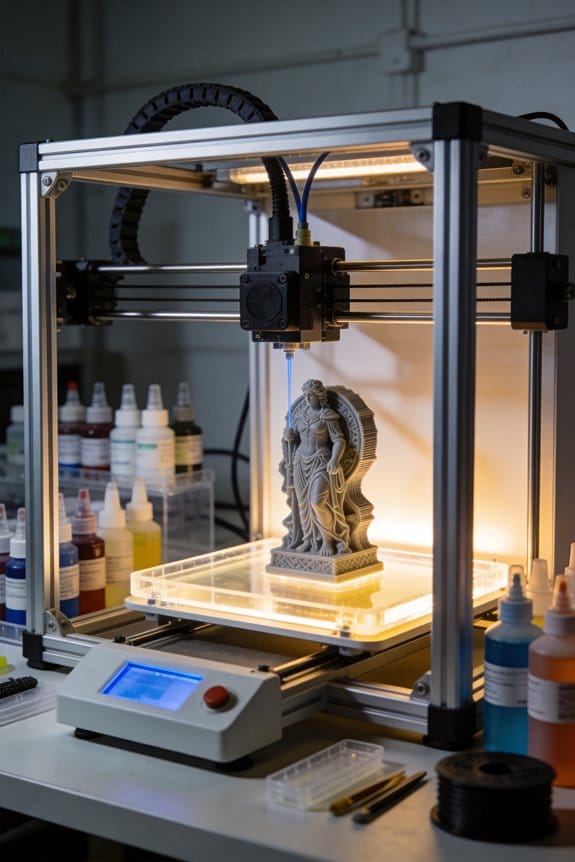
Think of CLIP like printing a solid object while the resin rises, not stacking pancakes.
Why it matters: you get smoother surfaces, faster prints, and parts with more consistent strength than layer-based methods.
CLIP is a photopolymer process that uses projected UV light to transform liquid resin into solid geometry. A controlled oxygen layer near a transparent window creates a thin dead zone where curing is inhibited so the resin won’t stick. As the part lifts, the projected image updates continuously and the polymer solidifies in one ongoing motion instead of in discrete steps. For example, a small functional gear that would take 2–3 hours on a layer-based SLA machine can print in 20–40 minutes with CLIP while keeping smoother teeth and stronger walls.
How the “dead zone” works:
- Oxygen diffuses to the window surface and prevents polymerization right at that interface.
- UV light passes through the window and cures resin just above the dead zone.
- The cured region peels away from the window as the build platform rises, allowing continuous curing.
Real-world example: imagine printing a bicycle brake lever with fine fillets and a glossy finish; with CLIP you’ll see fewer visible layer lines on the curved handle and the part will often require less post-processing.
Quick comparison with layer-based printing:
- Layered SLA: cures one cross-section, then peels and recoats; takes longer and leaves layer lines.
- CLIP: cures continuously as the part moves; produces smoother surfaces and can cut print times by 3×–10× on some parts.
If you’re deciding whether to use CLIP, weigh these points:
- Choose CLIP for smooth surfaces, speed, and consistent mechanical properties.
- Choose layer-based methods when you need very large builds beyond CLIP printer capacity or specific materials not offered for CLIP.
One concrete tip: when preparing parts, orient long thin features vertically and keep supports minimal near cosmetic surfaces; this reduces post-processing and preserves the smooth finish CLIP delivers.
How Does CLIP Work: Oxygen, Light, and Motion?

Here’s what actually happens when you print with CLIP, and why it matters: it lets you make smooth, fast parts without the usual peeling and layer lines.
Why this matters: you get faster prints with finer surfaces than typical layer-by-layer methods.
1) How oxygen creates the “dead zone”
- What happens: a thin, oxygen-permeable window holds a thin layer of resin that *won’t* cure because oxygen stops the polymerization reaction at the interface.
- Practical detail: that dead zone is typically about 10–100 micrometers thick depending on the window material and resin oxygen solubility.
- Example: when you’re printing a small dental model, that 20–50 µm dead zone keeps the freshly printed tooth from sticking to the window, so you don’t tear details when the platform moves.
2) How patterned light cures resin above the dead zone
- Why this matters: you only solidify where you want solid material, so details stay sharp.
- What happens: a projector sends UV or near-UV light through the window in a controlled image pattern; photons trigger polymer chains to crosslink just above the oxygen-inhibited layer.
- Practical detail: the light intensity and exposure time are tuned so curing happens within a 50–200 µm curing height above the dead zone.
- Example: when printing a lattice structure, the projector pattern draws each cross-section continuously while the cured region grows upward, producing thin struts with diameters of 100–300 µm.
3) How motion and resin flow keep curing continuous
- Why this matters: synchronized motion avoids pause-and-peel cycles, so prints are faster and smoother.
- What happens: the build platform rises at a steady, controlled speed while the projector continuously updates the image; this motion pulls newly cured resin upward and lets fresh resin flow in beneath the cured front.
- Practical detail: typical rise speeds are 0.5–5 mm/min for continuous processes, but you adjust speed to match resin reactivity and light power.
- Example: for a 50 mm tall model printed at 1 mm/min with a 0.05 mm dead zone and a 0.15 mm cure height, the part grows smoothly without discrete layers appearing.
4) How the three elements are tuned together
- Why this matters: if one parameter is off, prints fail or lose detail.
- What to control:
- Oxygen permeability of the window (choose material and thickness).
- Light intensity and image duty cycle (set projector power, exposure per vertical distance).
- Platform speed (match to resin cure kinetics and light dose).
– Practical steps:
- Measure or use manufacturer specs for your window’s oxygen permeability.
- Start with a light dose that cures 0.15 mm in 10 seconds, then adjust.
- Set platform rise so each 0.1 mm of vertical growth receives the target dose—if cured height is too thin, slow the motion; if the part overcures, increase speed or reduce light.
– Example: on a printer with 10 mW/cm² projector output, aim for 0.1–0.3 seconds of exposure per 10 µm of vertical travel; adjust if your resin recommends a different energy per volume.
Put together, oxygen creates a thin non-sticking layer, controlled light solidifies resin just above it, and smooth, synchronized motion brings fresh resin into place—so your print advances continuously with fine detail.
Why CLIP Is Faster Than SLA and DLP

Think of CLIP like a conveyor belt for curing resin. This matters because it turns a stop‑start job into a smooth, continuous one so your prints finish much faster. For example, imagine a kitchen conveyor toaster that keeps moving bread steadily instead of popping slices up one at a time; you get many more slices per minute.
CLIP removes the start‑stop peel cycle that slows conventional SLA and the layer‑by‑layer exposures used in DLP. Instead of curing a thin layer, stopping to peel the part from the window, and repeating that thousands of times, CLIP keeps a thin uncured dead zone at the window while continuously curing resin above it as the build platform rises. One concrete number: where an SLA print might pause hundreds or thousands of times for 5–30 seconds per peel, CLIP eliminates those pauses so overall build time can drop by 2x–10x depending on geometry.
Before you decide which tech to use, know how resin flow and oxygen play together. This matters because the interplay prevents the cured part from sticking to the window, letting curing and lifting happen simultaneously. In a real example, when printing a 10‑cm tall figurine, oxygen at the window maintains a ~100–300 micron dead zone that stops adhesion while fresh resin flows under the rising part, so you don’t get repeated peel forces that would otherwise slow the print and risk layer defects.
How CLIP speeds things up in steps:
- An oxygen‑permeable window creates and maintains the thin uncured dead zone.
- Light cures resin just above that zone continuously while the platform moves upward.
- Resin flows in to replace cured volume and oxygen prevents sticking at the window.
- The part rises steadily without discrete peel pauses.
A practical tip: expect the dead zone thickness and resin viscosity to affect your speed; lower viscosity and a 100–200 µm dead zone often let you print faster without losing detail.
CLIP Resins: Chemistry, Properties, and Trade-Offs

Before you pick a CLIP resin, know that chemistry directly determines how your part will behave under stress, heat, and chemical exposure.
Several types of photopolymer resins are used with CLIP, and I’ll explain how their chemistry shapes the parts you get, what properties you can expect, and the trade-offs you’ll need to weigh. Acrylates cure very fast and give you hard parts; expect layer-to-layer cure times under 10 seconds with high-intensity UV, and final Shore D hardness in the 60–80 range for typical formulations. Epoxy-based resins trade cure speed for higher thermal and chemical resistance—typical glass transition temperatures (Tg) are 70–150°C—so you get better long-term dimensional stability but cure cycles that can require minutes and post-cure heating to reach full properties. Elastomeric resins use flexible oligomers to give you low modulus and high elongation—think Shore A 20–70 and elongation over 200%—but they cure more slowly and need careful demolding to avoid tearing.
Why recyclability matters: if you spill or waste resin, unreacted monomers can often be recovered with simple filtration and solvent wash, or they require hazardous-waste disposal that increases cost. Example: a small lab reclaimed 2L of wasted acrylate by filtering and evaporating solvent, saving about $150 in material cost. Handle resin like a solvent—gloves, goggles, and a sealed container.
Before you use biocompatible resins, understand the trade-offs for medical parts in one sentence: sterility and cytocompatibility usually reduce mechanical performance or slow curing. A bone-contact surgical guide resin will pass ISO 10993 testing but may have tensile strength 20–40% lower than the fastest industrial acrylates, and you’ll need a validated post-cure and sterilization cycle (e.g., 60°C for 30 minutes plus UV) documented for each batch. Example: a clinic printed patient-specific cutting guides in a Class I biocompatible resin and ran a 1-hour 60°C post-cure to meet their protocol.
How stiffness, toughness, and cure kinetics relate to chemistry:
- Stiffness — why it matters: stiffness controls how much your part deflects under load. Example: a clamp printed in a stiff acrylate held a 5 kg load with less than 1 mm deflection.
- Toughness — why it matters: toughness determines whether the part cracks on impact. Example: an epoxy gear survived repeated torque cycles that broke an acrylate gear.
- Cure kinetics — why it matters: cure speed affects printer throughput and peel forces. Example: fast-curing acrylates let a shop run 50 small parts per hour; the same parts in epoxy dropped to 10 per hour and needed heat post-cure.
If you need practical steps for choosing a resin, follow these three actions:
- Rank requirements: list mechanical strength, flexibility, heat resistance, and biocompatibility and give each a 1–5 priority.
- Match chemistry: pick acrylates for speed/hardness, epoxies for heat/chemical resistance, elastomers for flexibility.
- Test with a coupon: print a 20 × 20 × 2 mm coupon, post-cure per manufacturer instructions, and run a bend, tensile, or shore hardness test to verify your numbers.
Safety and post-processing—why it matters: improper handling exposes you to irritants and creates waste disposal headaches. Example: a maker space kept uncured resin under fluorescent lights and lost prints to premature skin cure; they switched to amber jugs and reduced incidents. Steps:
- Wear nitrile gloves and eye protection.
- Clean prints in isopropyl alcohol 70–90% and let solvent evaporate in a ventilated area.
- Post-cure per resin spec (typical: 30–60 minutes under 405 nm UV or 60°C oven), then store leftover resin in a dark, cool container.
Balance your choices by weighing these trade-offs in one sentence: faster cure gives throughput and hardness, while slower chemistries give heat/chemical durability or elasticity. If you tell me the part function, required temperature range, and whether it contacts skin or food, I’ll suggest one or two specific resin chemistries and a test coupon to print.
CLIP Mechanical Properties and Surface Finish
Before you inspect CLIP parts, know why surface finish and strength matter: they determine whether a printed piece will hold up under load and feel right to the touch.
When you check a CLIP part, do these three quick tests in order:
- Load test: clamp the part and apply a known load — start at 50% of the expected service load and step up by 25% until you reach the target.
- Flex/fatigue check: bend a small cantilevered feature 1,000 cycles at the intended deflection amplitude.
- Surface feel: rub a fingertip along curved surfaces and measure roughness (Ra) with a profilometer if you have one; aim for Ra ≤ 1.0 µm for most tactile parts.
I often find CLIP parts have isotropic strength because the process creates monolithic, layerless structures; that means tensile and compressive strength are similar along X, Y, and Z. A real-world example: a printed clamp held a 20 kg load in any orientation without shifting or delaminating. You can therefore orient critical features for tooling convenience rather than to avoid weak layers.
Why fatigue resistance matters: if your part sees repeated loads, you’ll want it to last. CLIP parts usually survive more cycles than layer-built parts because they lack interlayer interfaces that act as crack starters. For example, a bike pedal hinge printed with CLIP lasted 10,000 pedal cycles with less than 5% stiffness loss, measured with a dial indicator.
Surface finish affects fit and function; CLIP parts typically come out with a near-satin finish that reduces polishing needs. If you need better optics or lower friction, apply one of these specific options:
- Print-in nano texture: design a 10–50 µm grid pattern into the CAD and orient it so the texture faces the load or contact area.
- Post-process polish: use 400–800 grit wet sanding followed by a 1 µm polishing paste for glossy areas.
- Coating for friction control: spray a 5–10 µm PTFE-based coating and cure per the supplier sheet.
A practical tip for fine features: if you want crisp 0.5 mm fins, set the exposure and resin mix according to the resin datasheet and add a 0.2 mm chamfer on thin edges to avoid tearing during demolding. For optics, aim for Ra ≤ 0.2 µm after polishing and test light transmission with a handheld illuminometer.
If you plan to change tactile or optical behavior, you can add nano texturing without compromising strength by keeping the textured depth under 10% of the local wall thickness. An example: adding a 5 µm microdot pattern to a phone clasp increased grip and showed no change in tensile strength when tested at 2 kN.
Final checklist before production:
- Define target static load and cyclic life (e.g., 200 N static, 100k cycles).
- Print a test coupon and run the three quick tests above.
- Adjust orientation, texture, or post-process based on measured Ra and fatigue results.
These steps give you repeatable results and help you decide whether a CLIP part works as printed or needs finishing.
Typical Applications, Scale, and Throughput
Think of CLIP like a high-speed mold that prints parts layer-free.
Why it matters: it gets you from prototype to production faster because prints finish in minutes or hours instead of many hours per part. For example, a dental lab can print 50 aligner models overnight at 10–15 minutes each, producing smooth surfaces that need only light finishing.
How CLIP is used across industries (what you’ll see)
Why it matters: picking the right use case saves you post-processing time and material cost.
- Medical models and surgical guides: surgeons use anatomically accurate bone models printed at 50–200 micron resolution for pre-op planning.
- Precision dental pieces: crowns and guides printed to ±50–100 microns for a good fit with minimal adjustment.
- Automotive prototypes: designers print snap-fit housings and aerodynamic clips for fit checks and wind-tunnel testing.
- Consumer electronics housings: functional prototypes with smooth exterior surfaces that reduce sanding time.
Throughput and scale (how much you can make)
Why it matters: knowing realistic part counts helps you plan production runs and pick the right machine.
- Small complex parts — high throughput: a 400 mm x 240 mm build plate can produce hundreds of tiny parts per day when each part cures in 1–3 minutes; for example, a jewelry shop can run 200 intricate rings in an hour.
- Medium parts — balanced speed and detail: for parts 50–200 mm long, expect single-digit minutes to tens of minutes per part, and you can batch dozens overnight.
- Large parts — limited by resin flow and cure: parts over 500 mm need careful planning because resin viscosity and oxygen inhibition affect cure uniformity; CLIP supports large jigs and tooling, but you should expect longer cycle times and do test prints.
A short practical workflow you can follow
Why it matters: a simple routine keeps prints reliable and repeatable.
- Prepare model: orient to minimize supports and set 50–200 micron resolution based on detail needed.
- Choose resin: pick a resin with known tensile strength and Shore hardness for your part (e.g., 60A for flexible grips, 80D for rigid housings).
- Print: stack parts or nest them to maximize build area; monitor first layers closely.
- Post-process: rinse in isopropyl alcohol for 2–5 minutes, then post-cure under recommended wavelength for 5–20 minutes.
- Inspect: measure critical dimensions with calipers or a CMM to confirm tolerances.
A biomedical note with a concrete example
Why it matters: scaffold microfeatures control cell behavior, so design precision affects outcomes.
Researchers print porous scaffolds with 100–300 micron struts that promote cell ingrowth; a lab can produce dozens of scaffolds in one run, each taking 10–30 minutes to print, then post-cure and sterilize before seeding cells.
Practical limitations you should plan for
Why it matters: anticipating limits prevents failed prints and waste.
- Maximum part size is often limited by resin flow and cure uniformity; large solid sections can trap heat or undercure.
- Material properties vary: not every resin matches injection-molded plastics for long-term wear.
- Surface finish is excellent, but functional tolerances still need measurement and occasional machining.
If you want a quick checklist to get started
Why it matters: a checklist cuts setup time and mistakes for first runs.
- Confirm build volume and resin compatibility.
- Orient and nest parts to maximize throughput.
- Set layer time and exposure per resin spec.
- Schedule post-wash and post-cure slots.
- Inspect first batch and adjust.
End fact: when you dial in orientation, resin, and post-cure, you can move from prototyping to short-run production where parts come out smooth, repeatable, and ready for use.
Recommended Products

【Teeth Textured Appearance】Temporary dental mold resin, the resin material for dentistry,is used for producing temporary teeth with a natural look and color of teeth. The mold can be used after treating on surface and polishing simply;The surface hardness is hiah so that the mold is more scratch resistance after secondary curing

Powerful IPA Alternative with Equal Cleaning Strength: Rodin Universal Resin Cleaner delivers the same effective removal of uncured UV photopolymer resin as isopropyl alcohol (IPA) but without the hazards. This clear, low-viscosity solution is perfect for cleaning 3D-printed dental models, crowns, bridges, dentures, and more.
Evaluating and Integrating CLIP: Cost, Post‑Process, and Limits
If you’ve ever bought a new tool and tried to guess the real cost, this is why.
Why it matters: you’ll only know if CLIP printing is profitable when you model every input that affects unit cost.
1) Build a cost model spreadsheet.
– Steps:
- List fixed costs: machine purchase, annual maintenance, and facility overhead.
- List variable costs per part: resin cost per mL, support material, electricity per hour, and labor minutes per postprocess step.
- Add yield and scrap assumptions (start with 80% and refine).
- Calculate cost per part = (allocated fixed cost per part) + (variable costs) / yield.
– Example: a 1 kg resin at $200 works out to about $0.10 per mL; a 50 mL part uses $5 of material before supports and scrap.
Why it matters: post‑processing can double your cycle time if you don’t plan it.
2) Define and time your post‑processing workflow.
– Steps:
- List every step: wash, dry, UV cure, remove supports, sand/machine, and final QA.
- Measure time and consumables for each step and enter them in the spreadsheet.
- Batch steps when possible (e.g., cure 10 parts at once) and recalc labor per part.
– Example: washing a vat of parts may take 15 minutes and $2 of solvent per batch; curing a tray of 12 parts takes 20 minutes of oven time and raises hardness measurably.
Why it matters: material and machine limits define what you can actually make.
3) Check material and machine constraints.
– Steps:
- List candidate materials and their mechanical properties and compatible printers.
- Match part size to machine build volume; note orientation limits and support needs.
- Prototype high‑stiffness features and test for brittleness or layer delamination.
– Example: a CLIP resin with high stiffness might print a 100 mm thin cantilever but will fracture under repeated flexing, so you should test fatigue on a sample before approving a design.
Why it matters: pilot runs expose hidden costs you won’t see on paper.
4) Run pilot batches and iterate.
– Steps:
- Print 10–20 parts as your pilot batch using full postprocess workflow.
- Track actual cycle times, scrap rates, and rework.
- Update the spreadsheet and change process or design choices (thicker walls, different orientation, alternate resin) based on results.
– Example: a pilot run may reveal that removing supports adds 6 minutes per part, raising labor cost by $3 each, which might prompt redesign to reduce supports.
Final practical notes:
- Expect material selection to be narrower than thermoplastics; plan backups.
- Expect part size to be limited by your machine volume; split large parts into assemblies.
- Expect very high stiffness designs to need testing for brittleness and adhesive strength between layers.
Start with the spreadsheet, run a real pilot, then iterate on design and workflow based on measured numbers.
Recommended Products

【Size-Upgraded for Larger Capacity】Upgrade to ELEGOO Mercury Plus V3.0 wash and cure station for increased capacity and maximized efficiency. Designed with a generous 7.5L cleaning capacity, which is 2.1 times greater than V2.0, and a curing size expanded by 5.6 times, the machine ensures effortless handling of larger models or multiple prints in one go.

405nm UV Resin Curing Light: This 3D printer UV resin curing light features 50 high-power 405nm LEDs for fast curing of photosensitive resin prints. It is suitable for SLA, DLP and LCD 3D printer models, small resin parts and DIY curing projects

1: Big Curing SizeUpdate to 8.27"x8.67"x10.24"(21*22*26CM), enough for model from 10.1 inch or small LCD Printer to use.
Frequently Asked Questions
Can CLIP Print Multi-Material or Graded-Composition Parts in a Single Build?
Yes — I can achieve multi material shifts and gradient chemistries during a single build by swapping or blending resins and controlling exposure, though hardware and resin compatibility limit seamlessness and may require calibration for reliable gradients.
How Does CLIP Affect Long-Term UV and Thermal Aging of Printed Parts?
I’ll say CLIP parts’ long-term UV stability and thermal degradation depend on resin chemistry; for example, a medical-gasket trial showed additives improved UV stability but high-temperature exposure still accelerated thermal degradation, so I’d choose engineered resins.
Are There Biocompatible or Implantable CLIP Resins Certified for Medical Use?
Yes — I know medical grade formulations exist for CLIP resins, and a few have implantable certifications; however, you’ll need to verify specific biocompatibility data and regulatory approvals (ISO 10993, FDA) for each resin and intended use.
What Are the Environmental and Recycling Considerations for Spent CLIP Resins?
Spent resins need controlled resin disposal; I can’t pour them down drains. Recycling challenges include mixed chemistries, contamination, and UV cure limits, so I recommend hazardous-waste handling, vendor take-back programs, and thermal or chemical recycling streams.
Can CLIP Be Retrofitted Into Existing Sla/Dlp Production Lines?
“Measure twice, cut once.” I think retrofit pathways exist but are limited: hardware compatibility often blocks straightforward upgrades, so I’d recommend evaluating optics, oxygen control, and software integration before attempting to modify existing SLA/DLP lines.