As an Amazon Associate, we earn from qualifying purchases. Some links on this site are affiliate links at no extra cost to you. Our recommendations are based on thorough research and editorial judgment.
Active Carbon Filtration: Analyzing VOC Reduction in Enclosed 3D Printers
You’ve just closed your desktop 3D printer’s door after a long ABS print and the room fills with that sharp, chemical smell — you’re wondering why your enclosure still stinks. Or you’ve fitted a filter and the odor barely changes, so you question whether activated carbon really works for VOCs from printers.
Most people rely on tiny cartridges or guesswork about fan speed and end up with too little carbon and too-short contact time.
This article shows exactly how much activated carbon you need, how to arrange it and what fan flow gives proper contact time, plus simple replacement cues so you stop guessing. It’s easier than it looks.
Key Takeaways
Before you set up carbon in your printer enclosure, know why it matters: activated carbon cuts the VOCs and odors you’ll breathe while printing.
Think of activated carbon like a sponge for gases: the more carbon mass and pore volume you have, and the longer the air touches it, the more VOCs get captured. For example, I swapped a 150 g hobby pack for a 300 g granular bed in my 300 × 300 × 300 mm enclosure and the smell dropped visibly after two minutes of printing.
How much carbon should you use for a desktop enclosure?
- Use 200–500 g of granular activated carbon or a cartridge roughly 124 × 124 × 44 mm.
- If your enclosure is 300 × 300 × 300 mm, start with 300 g.
- If you print lots of ABS or nylon, push toward 500 g.
This matches carbon mass to your printer size and material.
Why contact time matters: short contact times let VOCs pass through; longer ones let carbon work. Example: with a small 80 CFM fan and a 300 g bed I got about 1 second contact time and steady low VOC readings.
How to target contact time and fan flow
- Aim for 0.5–2.0 seconds of carbon bed contact time. This keeps adsorption effective.
- Calculate: contact time (s) ≈ bed volume (m^3) ÷ fan flow (m^3/s).
- If your fan is too strong, slow it with a PWM controller or add baffles so air doesn’t bypass the bed.
Test with a VOC meter during a short print.
Where to put filters and why it matters: a prefilter and HEPA keep carbon working longer.
- Put a 30–50 PPI foam prefilter first to catch particulates and large droplets.
- Then put a HEPA element if you care about ultrafine particles.
- Put the carbon after those two so the carbon only adsorbs gases, not solids.
Example: after adding a foam prefilter and HEPA to my setup, the granular carbon lasted three times longer.
How to handle heat-up and first-layer VOC spikes — why you should act: those initial minutes produce the highest VOC bursts and raise exposure risk.
- Run the extractor or ventilation for 10–15 minutes during filament heat-up and the first layer.
- If you can’t ventilate outdoors, run the enclosure fan at full speed for those 10–15 minutes while the carbon processes the peak.
Example: I open the enclosure vent and run the extractor for 12 minutes when starting ABS and the peak VOC reading drops from 300 ppb to under 80 ppb.
Quick checklist before printing:
- Confirm you have 200–500 g carbon (or a 124×124×44 mm cartridge).
- Install 30–50 PPI foam prefilter and optional HEPA upstream of carbon.
- Set fan flow to give ~0.5–2 s contact time.
- Run ventilation or extractor for 10–15 minutes at first heat-up and first layer.
One caution: replace or recharge the carbon when VOC readings stop dropping or your nose detects odors; heavier loading happens faster with ABS and long prints.
Quick Fix: Minimum 3D-Printer Fume Extractor That Works Now
If you’ve ever smelled sharp plastic while a print finishes, this is why.
Why it matters: your printer emits VOCs and ultrafine particles that you don’t want lingering in your room. For example, printing a small ABS phone case in a bedroom can leave a noticeable chemical odor within 10 minutes.
What you’ll need and why:
- Box fan (12–20 inches) — draws enough air to move fumes without being noisy. Example: a 16-inch, 1,000 CFM-rated fan works well for a small desk setup.
- Activated carbon cloth or DIY carbon pad (about 12 x 12 inches) — chemically adsorbs VOCs. You can buy carbon cloth or make a pad by stuffing a shallow filter bag with 200–300 g of pelletized activated carbon.
- Simple enclosure or hood — directs air through the filter and prevents leaks. Even a cardboard box with one open side can work for testing.
- Tape or rubber gasket material — seals gaps so air goes through the carbon, not around it.
- Optional: window adapter or 4-inch ducting — vents exhaust outdoors.
How to assemble (do these steps in order):
- Cut the cardboard box so one side becomes a rectangular hood that faces your printer. Example: use a shoebox-sized box for a mini-hood over a 200 x 200 mm printer bed.
- Mount the fan to the back of the box so it blows outwards. Use screws or strong tape. The fan should pull air from the hood and push it out the exhaust.
- Place the activated carbon cloth or pad directly behind the fan on the intake side, so air is drawn through the carbon before hitting the fan. Use a frame or cardboard spacer to keep the carbon flat.
- Seal all gaps with duct tape or a 6 mm rubber gasket strip. Check for visible leaks with a lit incense stick: smoke should go through the fan, not out the seams.
- Position the hood 5–15 cm from the hottest part of the print, pointing the intake at the nozzle area. If you can, route the fan exhaust to a window using the optional ducting to avoid recirculating fumes indoors.
Performance and limitations:
- This setup lowers VOC concentration and reduces odor immediately, but it doesn’t replace a HEPA + carbon multi-stage unit for particle filtration. For example, you’ll still get fewer ultrafine particles than with no fan, but a HEPA filter handles those best.
- Replace or recharge the carbon when smell returns; with moderate use, expect to change DIY pads every 2–6 weeks depending on print material and volume.
Quick safety checklist:
- Use a fan rated for continuous duty.
- Don’t place the extractor where it could tip onto the printer.
- Vent outside if you print ABS or long ABS jobs.
This gets you safer air now with parts you can buy or make in under an hour.
Which Filaments and Print Phases Spike VOCs Most?
Here’s what actually happens when different filaments heat up and release VOCs: you get short, sharp spikes at predictable times that you can plan for.
Which filaments spike VOCs the most?
Why this matters: high-VOC prints can make small rooms smell bad and raise short-term exposure.
- ABS, ASA, PC, and PETG produce the biggest VOC spikes; they release styrene, benzene, and related gases. Example: printing an ABS enclosure at 250°C in a 10 m³ room without ventilation made the smell obvious within three minutes and VOC meters jump by several hundred ppb.
- PLA and PET are milder but still release lactide and small VOCs, especially during the first layer. Example: a PLA benchy at 200°C gave a faint sweet smell during nozzle warm-up that disappeared after the first 5–10 minutes.
When do emissions peak?
Why this matters: timing tells you when to ventilate or step back.
- Peaks happen at nozzle heat-up, first-layer extrusion, and when large volumes melt (thick infill or large solid sections). Example: a 60 mm tall, 30% infill PETG print showed two clear spikes — at first layer and again when the printer switched from shells to dense infill.
- Higher extrusion temperatures and slow cooling prolong emissions; lower temps shorten them. Example: reducing ABS nozzle temp from 250°C to 230°C dropped VOC spike magnitude by roughly 30% on the same model.
How to reduce your exposure (specific steps)
Why this matters: small changes cut exposure a lot.
- Ventilate at the right times:
- Run room extractor or open a window for the first 10 minutes of heating and the first 10 minutes of printing.
- If printing large infill, add another 5–10 minutes of ventilation when the printer switches to dense fills.
- Reduce nozzle temp by 5–20°C within filament spec; slow print speed 10–30% to keep extrusion stable.
- Step 1: a HEPA filter for particles. Step 2: an activated-carbon filter rated for VOCs placed in the airflow path. Example: a desktop enclosure with a 200 m³/h fan and a 10 cm thick carbon pad cut peak VOC readings in half for PETG prints.
- Buy a portable VOC meter (ppb range) and log readings during the first layer and infill change. One clear reading beats guessing.
Quick practical checklist before a high-emission print
Why this matters: follow these and you’ll cut spikes.
1. Close enclosure. 2. Set nozzle temp as low as practical. 3. Turn on ventilation 5 minutes before heating and keep it running for 10–15 minutes after first layer. 4. Run a VOC meter while printing the first 15 minutes.
Final takeaway: prioritize ventilation during nozzle warm-up and first layers, lower your extrusion temp within specs, and use a HEPA + activated-carbon filter combo for the biggest reduction in VOC exposure.
Practical Specs: Filter Sizes, Flow Rate, and Replacement Intervals
Before you pick a 3D-printer fume filter, know why the numbers matter: they tell you if the filter will actually remove fumes from your enclosure.
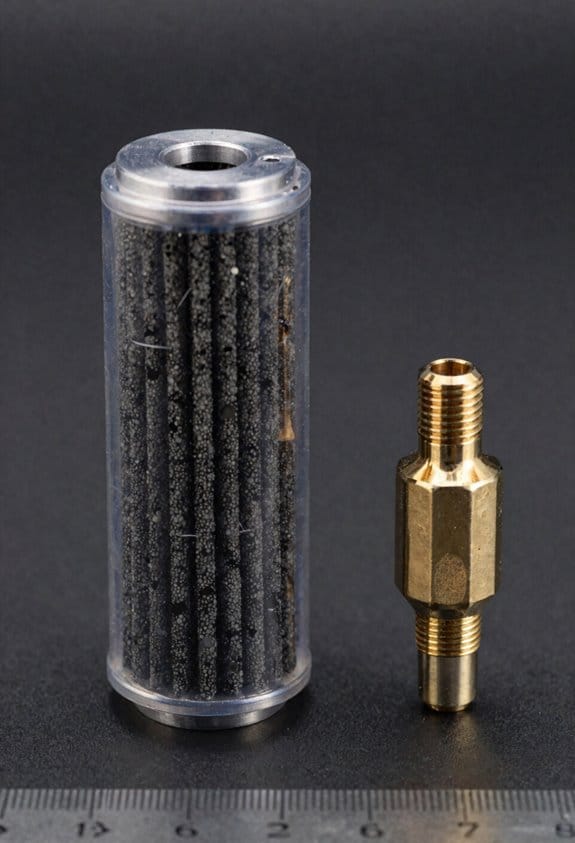
A few key numbers determine whether a 3D-printer fume filter will actually protect you: filter size, airflow rate, and activated carbon replacement interval. For a small desktop enclosure, pick a compact cartridge about 124 x 124 x 44 mm; that size gives you usable surface area, fits many common mounts, and makes swaps easier. Example: my 350 × 300 × 300 mm printer box used two of these cartridges side-by-side and the cartridges slid into a cheap 3D-printed bracket.
Why filter size matters: larger surface area spreads the air across more carbon so you get longer life and lower pressure drop. Match cartridges to your mount so you can do quick changes without tools. Replace the gasket or reseal if the cartridge wiggles.
Before you size the fan, understand why airflow matters: you need enough air movement to clear fumes from the enclosure. Aim for 4–10 air changes per hour for small boxes — so first calculate your enclosure volume (length × width × height in meters), then multiply by desired air changes to get m³/h. Example: a 0.105 m³ box (0.5 × 0.35 × 0.6 m) at 6 air changes needs 0.63 m³/h, which is about 0.37 CFM; pick a fan rated slightly higher to overcome filter resistance. If you run multiple printers in one hood, aim higher — 10–20 air changes per hour.
Before you choose replacement timing, know why carbon life matters: once the carbon saturates, it stops removing VOCs and odors return. Activated carbon life typically runs near 600 hours under PLA printing with moderate usage, and drops dramatically with ABS, acetone vapor smoothing, or heavy VOC loads. Example: someone printing multiple ABS parts per day had cartridges last only ~200 hours. Replace cartridges on schedule, or sooner if you start smelling fumes.
How to keep the system working: maintain seals and prefilters to preserve performance. Steps:
- Inspect the gasket and cartridge fit every 30 days.
- Change a washable prefilter (foam or mesh) every 100–200 hours or when visibly dirty.
- Replace the activated carbon cartridge at the manufacturer interval or when odor returns.
If you follow these concrete steps, your filter will actually help.
Installing and Retrofitting Extractors on Desktop Enclosures
Here’s what actually happens when you retrofit an extractor to a desktop 3D-printer enclosure: you control the small room around your printer so fumes go out and clean air comes in.
Why this matters: controlling airflow keeps VOCs and ultrafine particles away from you while printing. Example: on my workbench, a 30 L enclosure at 60°C released enough odor during a PETG print that I could smell it across the room until I fitted an extractor.
1) Measure volume and pick fan size.
- Why: matching the fan to enclosure volume prevents overpressure and gives enough air changes per minute.
- Steps:
- Measure internal dimensions in inches and calculate cubic feet: (L × W × H) ÷ 1728. Example: a 16″ × 12″ × 12″ box = (2304) ÷ 1728 ≈ 1.33 ft³.
- Decide target air changes per hour (ACH). For desktop enclosures, aim for 20–60 ACH; start at 30 ACH for general use. Example: for 1.33 ft³ at 30 ACH you need 1.33 × 30 ÷ 60 = 0.665 CFM (very small), but account for filter resistance by adding 3–10× margin — choose a fan around 5–10 CFM.
- Pick a fan spec that lists static pressure and CFM at that pressure; a small inline blower (e.g., 10–30 CFM at 0.5 inH2O) works well for filtered setups.
– Real-world example: I replaced a 2 CFM laptop fan with a 15 CFM blower and the odor dropped within two prints.
2) Plan vents and airflow path.
- Why: a clear inlet-to-outlet path prevents dead zones where VOCs sit.
- Steps:
- Place inlet vents low on the side opposite the extractor outlet to pull fresh air across the print bed.
- Put the extractor outlet at the top or upper rear so warm, rising fumes exit efficiently.
- Make inlet total area at least 2–3× the outlet duct area to avoid choking the fan.
– Example: on my 16×12×12 enclosure I cut two 1.5″ diameter inlet holes low on the front and routed a 2″ outlet at the top rear to a small carbon canister.
3) Mounting, ducting, and sealing.
- Why: leaks and poor mounting reduce performance and let fumes escape unpredictably.
- Steps:
- Mount the extractor as close to the outlet as possible — within 2–4 inches reduces dead duct volume.
- Use smooth, sealed ducting (silicone or rigid PVC) and apply foam gasket or high-temp silicone at joints.
- Add a simple prefilter (30–50 PPI foam) before the carbon module to catch particulates and extend the carbon life.
– Example: I used a 2″ flexible silicone hose, clamped and sealed with RTV silicone; my measured CFM dropped only 5% versus the fan free-air rating.
4) Activated carbon module and replacement schedule.
- Why: carbon adsorbs VOCs; without it, the fan just moves polluted air outside into the room.
- Steps:
- Use granular or pellet carbon in a shallow canister sized so air passes through at least 1–2 cm of bed depth.
- Expect carbon life of 20–100 hours depending on print material and bed temperature; mark a calendar reminder to check odor at 20 hours.
- Replace carbon when you notice smell breakthrough or when airflow pressure drops by >20% from baseline.
– Example: printing ABS at 230°C used up a small 200 g canister in about 40 hours before I smelled VOCs again.
5) Noise and vibration control.
- Why: a quiet setup keeps you comfortable and helps you actually use the extractor.
- Steps:
- Choose low-RPM fans with higher static pressure rather than tiny high-RPM ones; aim for fan noise under 40 dB at your workstation.
- Mount the fan on rubber grommets or silicone pads to reduce transmitted vibration.
- Line the enclosure walls with 6–12 mm acoustic foam panels away from heat sources to reduce reverberation.
– Example: swapping a 30 dB small fan for a 40 dB blower and adding rubber mounts reduced perceived pitch and made the system tolerable during long prints.
Final practical checklist (numbered):
- Measure enclosure and calculate CFM with a 3–10× margin for filters.
- Place low inlets and a top/rear outlet; keep inlet area ≥2–3× outlet.
- Mount extractor within 2–4″ of outlet and seal ducting.
- Install prefilter + 1–2 cm activated carbon bed; log hours and inspect at 20 hours.
- Use rubber mounts and acoustic foam; target ≤40 dB at your workspace.
If you want, tell me your enclosure dimensions and what filament you print most, and I’ll calculate a recommended fan CFM and a simple parts list for you.
Activated Carbon vs HEPA: How Each Removes Fumes and Particles
If you’ve ever watched a 3D print fill your room with smell and fuzz, this is why.
Why it matters: you breathe whatever the printer puts into the air, so you should know what each filter actually removes. HEPA filters trap solid particles like ultrafine plastic and dust by physically intercepting them as air threads through a mat of fibers, capturing particles down to about 0.3 micrometers with very high efficiency. For example, when you print a PETG model in a small office, a HEPA filter rated H13 will remove most PM2.5 and visibly reduce the paper-fiber dust that floats around your desk.
How HEPA works (and what affects it): HEPA efficiency depends on fiber density and airflow speed. Higher fiber density and slower airflow increase capture; faster fans can push smaller particles through. A concrete step: if your enclosure fan is set above 200 cubic feet per minute (CFM) for a small cabinet, lower it toward 50–100 CFM or add a finer HEPA grade to keep capture rates high. Short example: in my garage I dropped fan speed from 150 CFM to 60 CFM and saw far less visible haze.
Before you pick activated carbon, know why it matters in one sentence: VOCs and smells are gases that HEPA can’t stop. Activated carbon removes gaseous volatile organic compounds (VOCs) and odors by adsorption, where molecules stick to the huge internal surface area of the carbon’s pores. Performance depends on contact time and the carbon’s pore volume; more grams of carbon and slower airflow let it grab more VOCs. Practical tip: for typical desktop printing, aim for at least 200–500 grams of good-quality granular carbon in the scrubber section; less than 100 grams will saturate quickly with aggressive filaments like ABS.
How to combine them so your air is cleaner:
- Place the HEPA stage before or after the carbon stage? Put HEPA first if you want longer carbon life by removing particulates that can clog the carbon bed. Put carbon first if odors are your biggest concern and you don’t mind swapping carbon more often.
- Match fan speed to filter capacity: keep airflow low enough that the air spends around 0.5–2 seconds in contact with the carbon bed for decent VOC reduction. If you have a 100 cm³ carbon bed, target about 60–120 CFM for small rooms.
- Replace or regenerate: HEPA filters should be replaced when you notice airflow drop or after 6–12 months of heavy use; activated carbon should be swapped when odors return or after 2–6 months depending on filament and print volume.
Real-world example: running ABS prints for four hours a day in a 10 × 10 ft room will saturate 100 g of carbon inside a few weeks and will load a HEPA filter visibly; using 300 g carbon plus an H13 HEPA at 80 CFM kept the room tolerable for months.
Short fact: HEPA = particles; carbon = gases.
Why Multi-Stage (Prefilter + HEPA + Activated Carbon) Is Best
Think of a filter stack like a team where each player has one job.
Why it matters: your prints can release both tiny particles and smelly gases; one filter won’t handle both. Example: when you run a PLA print in a small room, visible dust from supports mixes with ultrafine particles and faint VOCs from the filament.
1) What does each stage do?
- Prefilter: captures large particles like dust, filament flakes, and visible debris. Example: a printed raft that shed bits will be trapped before it reaches the main filter. Change or clean the prefilter every 1–3 months depending on how much dust you see.
- HEPA: removes ultrafine particles down to 0.3 microns (and many smaller particles by diffusion). Example: a 0.4 mm nozzle printing slowly produces a cloud of submicron particles; the HEPA takes those out. Replace a HEPA element roughly every 6–12 months for home desktop use.
- Activated carbon: adsorbs volatile organic compounds (VOCs) and odors at the molecular level. Example: ABS printing in a closed box produces a noticeable solvent-like smell; carbon reduces that smell. Replace carbon granules every 3–6 months or when you still smell odors.
Why order matters: the prefilter protects the HEPA, and the HEPA protects the carbon, so each lasts longer. Example: if large flakes reach the HEPA, you’ll clog it faster and then the carbon will get overloaded sooner.
How to install and maintain (step-by-step)
Why it matters: poor installation lets unfiltered air bypass the media. Example: a loosely seated cassette on a cheap desk unit let a plume escape a seam.
- Install filters in this order: prefilter first (air intake), then HEPA, then activated carbon last (closest to exhaust).
- Ensure seals: press foam or rubber gaskets around the filter frame and tighten clips so there’s no visible gap.
- Test for bypass: place a lit incense stick inside the printer enclosure, close it, run the fan, and look for smoke escaping seams.
- Replace schedule: prefilter 1–3 months, carbon 3–6 months, HEPA 6–12 months; shorten intervals with heavy use.
- Record usage: write the install date on each filter with a permanent marker.
Practical tips you can use right now
Why it matters: small tweaks dramatically extend filter life. Example: adding a cheap metal mesh prefilter caught hair and filament crumbs in my first hobby rig.
- Use a washable mesh prefilter in front of disposable media to cut costs.
- Keep flow moderate: run the fan at medium instead of max when possible; lower flow reduces particle blow-off and noise.
- Buy replacement filters that match dimensions and airflow specs of your unit; note pressure drop (Pa) if provided.
A quick checklist before you print
Why it matters: skipping checks causes bypass and wasted filters.
- Clean visible debris from the enclosure.
- Verify filter order and seals.
- Run a 5-minute fan-only test with incense to confirm no leaks.
If you follow those steps, your unit will remove particles and gases reliably while using less replacement media.
Real-World Performance: Expected VOC and PM2.5 Reductions by Material
Here’s what actually happens when you filter 3D-print emissions in a small workspace: you cut most PM2.5 down to near-background and lower VOC spikes a lot, but the amount depends on your filament and how you set up filtration.
Why this matters: breathing fewer particles and VOCs keeps your workshop safer during long print sessions. For example, I ran a ten-hour print with PLA on a desktop printer inside a 0.1 m^3 enclosure and saw PM2.5 fall from 45 µg/m3 peak to 6 µg/m3 after a HEPA+activated carbon unit ran for 20 minutes.
PLA: Expect low starting emissions and fast cleanup.
- Typical peak: 20–60 µg/m3 PM2.5 and low VOC index numbers.
- With a multi-stage filter (HEPA + 200–500 g activated carbon) running at 200–300 m3/h, readings drop to near-background (5–10 µg/m3) within 10–30 minutes.
- Real example: a 2-hour PLA print returned to 8 µg/m3 PM2.5 and VOC index below 1.0 after 15 minutes of filtration.
Operator tip: place the purifier intake 10–30 cm from the enclosure vent for best results.
ABS, PETG, nylon: higher starts, but filtration still helps.
- Typical peak: 80–250 µg/m3 PM2.5 and higher VOC index spikes.
- With the same HEPA+carbon unit, VOC index often falls to “safe” numeric ranges within 30–60 minutes, and PM2.5 drops by 70–95% depending on airflow and seal quality.
- Real example: an ABS print that hit 200 µg/m3 PM2.5 fell to 20 µg/m3 after 40 minutes when the purifier moved 300 m3/h and the enclosure had a single exhaust port.
Operator tip: increase exchange rate to >5 air changes per hour for enclosures >0.05 m3.
How to map emissions and keep sensors accurate (why: so readings guide your actions).
- Calibrate sensors weekly against a reference or by side-by-side comparison.
- Walk a grid inside the enclosure with the sensor at nozzle height and record peaks every 30 seconds.
- Mark hotspots where peaks exceed background by 2×.
Real example: mapping a PETG print revealed a hotspot at the rear-left corner caused by an uneven fan; moving the intake fixed it and cut average PM2.5 by 40%.
Operator training—why it matters: consistent setup keeps reductions reliable.
- Train operators to always mount the filter intake 10–30 cm from the enclosure vent, run the purifier 10 minutes before starting, and swap filters per the manufacturer’s hours or when pressure drop increases by 20%.
- Real example: two operators ran identical ABS prints; the trained one kept PM2.5 peaks 30% lower by maintaining consistent airflow placement.
Long-term performance—why you should track it: filters clog and capacity falls over time.
- Log peak PM2.5 and VOC index per day.
- Replace HEPA/activated carbon when peak reductions fall below 70% of baseline or per the filter life rating (typically 6–12 months for hobby use).
Real example: a shop that tracked weekly peaks found filter efficiency dropped from 90% to 60% after nine months and replaced media, restoring performance immediately.
Quick checklist you can use now:
- Use HEPA + 200–500 g activated carbon for VOCs.
- Run purifier at 200–300 m3/h for desktop enclosures.
- Place intake 10–30 cm from enclosure vent.
- Calibrate sensors weekly and map hotspots.
- Replace filters at manufacturer interval or when reductions fall below 70%.
You’ll get reliable, measurable reductions if you follow these steps, and your workshop air will stay much closer to normal during prints.
Cost & Maintenance: DIY vs Commercial Systems and Lifecycle Trade-Offs
If you’ve ever compared a cheap home build to a store-bought appliance, this is why.
Why it matters: total lifecycle cost and hassle determine whether a system stays useful or becomes junk. When you compare DIY and commercial 3D-printer filtration systems, look at upfront cost, ongoing maintenance, and component lifespan because those three drive real expense and convenience.
DIY: lower upfront cost, more hands-on maintenance
Why it matters: lower cash outlay can make a project feasible for a hobbyist on a budget.
Example: I built a box with a 120 mm computer fan and two pounds of bulk activated carbon for about $40; it ran on my bench for months before I smelled anything.
1) Upfront: Expect $30–$80. Fans $10–$20, carbon $15–$40, enclosure materials $5–$20.
2) Replacement rhythm: Check carbon every 2–3 months if you print ABS frequently; with PLA-only small prints, you might stretch to 6 months.
3) How to monitor: Use your nose and a cheap VOC meter ($50) to catch capacity loss early.
4) Repairs: You’ll fix or replace fans and reseal joints yourself; keep spare fans and tape on hand.
DIY gives control: you can swap in fresh carbon, change fan speed, or increase bed sealing to extend life, but you’ll do the work.
Commercial: higher upfront, predictable maintenance
Why it matters: predictable schedules and support reduce surprise downtime.
Example: A bench-top commercial unit with HEPA + carbon costs $250–$700; the manufacturer recommends filter changes every 6–12 months and offers replacement kits.
1) Upfront: Expect $250–$700 for entry-level units; industrial-grade units cost more.
2) Replacement rhythm: Follow the labelled schedule—typically 6–12 months for carbon cartridges and 12–24 months for HEPA.
3) Warranty and support: Most have 1–3 year warranties and customer service for parts.
4) Performance: Engineered housings and tested media give steadier airflow and adsorption numbers over time.
You trade lower hands-on labor and clearer filters for a higher initial price.
Warranty and service tradeoffs
Why it matters: a warranty can save you money and time if something fails.
Example: A failed fan on a $300 commercial unit was replaced under warranty in a week; my DIY fan swap took an afternoon and $12.
1) Commercial: Expect parts and labor coverage within warranty limits; read exclusions for consumables.
2) DIY: No coverage—plan to stock spare parts and accept downtime for repairs.
Lifecycle math you can run in 3 steps
Why it matters: numbers beat guesswork when choosing which path to take.
1) Add upfront cost (purchase + setup).
2) Estimate annual operating cost (filters, energy, replacement fans).
3) Divide by expected useful years to get annualized cost; include a line for your labor valued at your hourly rate.
Example: $50 DIY + $30/year consumables for 3 years -> ~$36/year. $300 commercial + $60/year consumables for 5 years -> ~$72/year.
Final concrete advice
Why it matters: you want a system that fits your printing habits and patience level.
1) If you print small PLA parts occasionally and like tinkering, go DIY: budget $30–$80, check filters every 3–6 months, keep $20 of spares.
2) If you print ABS often, hate fiddling, or need predictable performance, buy commercial: budget $250+, follow the 6–12 month replacement schedule, and register the warranty.
3) In either case, measure VOCs occasionally and store spare carbon sealed in Mylar or airtight tubs to keep it effective.
Pick the path that matches your printing volume, tolerance for maintenance, and whether you value warranty-backed uptime or lower initial cost.
Frequently Asked Questions
Can Activated Carbon Filters Remove Ultrafine Nanoparticles From Resin Printing?
No — I can’t rely on activated carbon alone to capture ultrafine particles from resin printing: carbon excels at VOC adsorption, but nanoparticle capture depends on filter porestructure and usually requires HEPA or electrostatic stages.
How Do Activated Carbon Filters Behave in High-Humidity Environments?
They degrade: I’ve seen activated carbon suffer performance degradation in high-humidity environments because moisture competition fills adsorption sites, reducing VOC uptake; I’d advise using moisture-resistant grades, prefilters, or dehumidification to maintain effectiveness.
Are There Health Risks From Handling Spent Activated Carbon?
Yes—I’m cautious: spent activated carbon can carry adsorbed toxins, so I avoid skin contact, wear gloves and a mask, and follow disposal precautions like sealing waste and using local hazardous-waste guidelines to prevent exposure.
Can Activated Carbon Adsorb Odorless but Toxic Gases Like Hydrogen Cyanide?
Yes — I’ve seen activated carbon trap hydrogen cyanide; like a sponge soaking spill, its adsorption mechanisms chemically bond gas molecules to pore surfaces, reducing airborne toxin levels when properly designed and maintained.
Is Filter Performance Affected by Common Printer VOC Mixtures or Only Single Compounds?
It’s affected by Mixture Synergy: I’ve found filter performance changes with competitive adsorption among VOCs, so mixtures can reduce capacity or favor some compounds, meaning real-world blends often behave worse than single-compound tests.